Edible
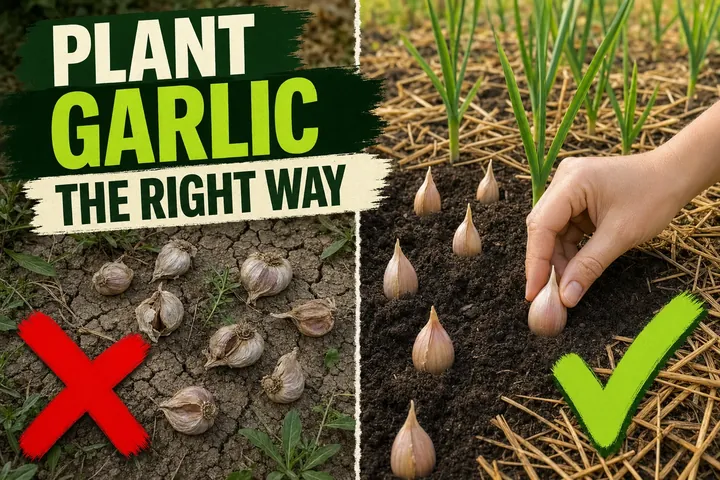
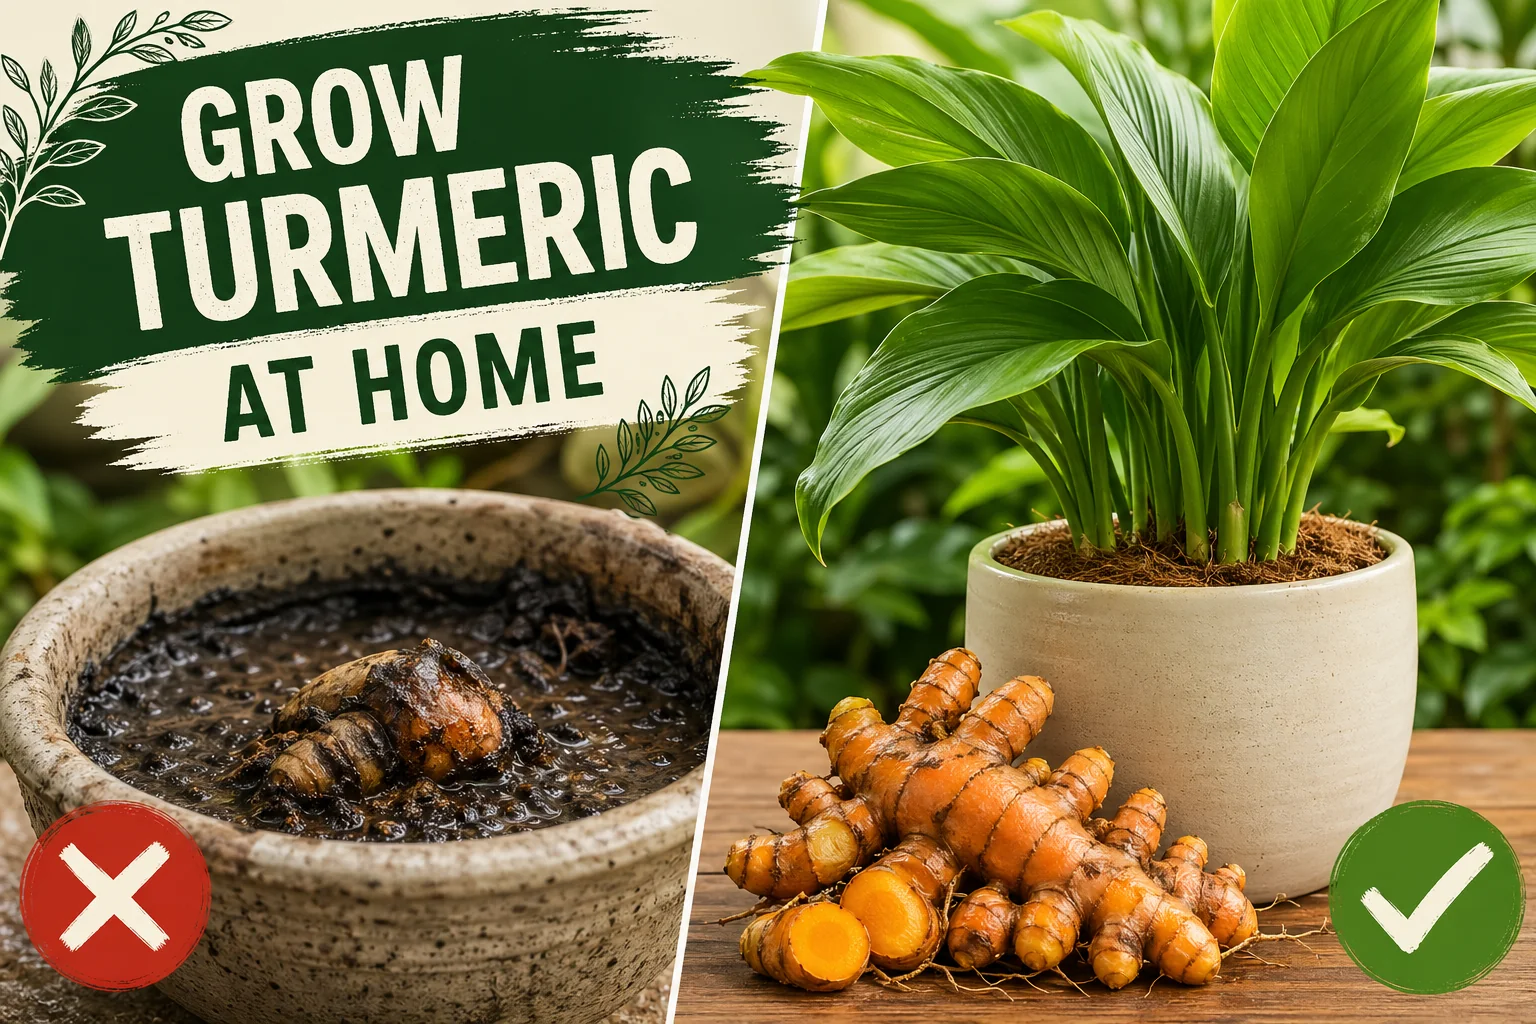
How to Grow Turmeric at Home (Container & Garden Guide)
Learn how to grow turmeric at home from rhizomes — right pot, soil, heat, and the 9-month growing cycle explained step by step. Harvest, cure, and store fresh roots.
On this page
- Quick answer
- Why turmeric needs special attention
- Sourcing the right rhizomes
- Pre-sprouting: the step most people skip
- Choosing your pot
- The right soil mix
- Planting depth and orientation
- Light requirements
- Heat: the most critical factor
- Watering through the season
- Feeding your plant
- The 9–10 month growing season
- How to harvest turmeric
- Curing and drying your roots
- Turmeric vs ginger: key differences
- Common problems and fixes
- Watch: growing turmeric video guide
- Conclusion
Watch the visual walkthrough
5 Tips How to Grow a Ton of Turmeric in Just 3 Square Feet Garden Bed
This video shows my five most important tips on how to grow a lot of turmeric in just a small space either in a container or a tiny ...
Turmeric (Curcuma longa) is one of the most satisfying edibles you can grow at home. A single organic rhizome planted in spring turns into a lush tropical plant all summer, then rewards you in autumn with a cluster of fresh golden roots that grocery stores charge a premium for. The challenge is that turmeric needs heat above almost everything else, a deep container, and a full 9–10 months of frost-free growing time.
Get those three things right and the rest is manageable. This guide covers sourcing rhizomes, pre-sprouting, pot and soil choice, planting, light, heat management, watering, harvesting, and curing.
Quick answer
Start with certified organic Curcuma longa rhizomes — non-organic roots are often sprout-inhibited. Pre-sprout in a warm dark place for 2–3 weeks, then plant 5 cm (2 in) deep, eyes facing up, in a deep pot (at least 30 cm / 12 in deep) filled with loose, well-drained, slightly acidic potting mix. Keep consistently moist, temperatures between 24–32°C (75–90°F), and in bright warm indirect light. Allow 9–10 months to harvest — dig the entire plant when the leaves yellow and die back. Cure the roots by boiling then drying.
Why turmeric needs special attention
Turmeric is native to the Indian subcontinent and tropical Southeast Asia, where it grows in hot, humid, partially shaded conditions with a distinct wet and dry season. It is not adapted to cool, short summers or compacted, heavy soil. When home growers fail with turmeric, it is almost always for one of three reasons:
- They planted non-organic rhizomes treated with a sprout inhibitor.
- Their growing space was too cool (below 21°C / 70°F at night).
- They used a pot that was too small or a soil mix that was too dense.
None of these problems are difficult to fix. Understanding why they matter is the first step.
Sourcing the right rhizomes
Buy certified organic. This is the single most important decision you make before anything touches soil.
Most supermarket turmeric is treated with a sprout inhibitor to extend shelf life. These inhibitors work well: a treated rhizome can sit in perfect warmth and moisture for weeks and simply never wake up.
Certified organic rhizomes sold for planting are not treated. Sources to look for:
- Seed suppliers and online garden specialists (search “organic turmeric rhizomes for planting”).
- Natural food stores and farmers’ markets, where organic roots are typically untreated.
- Specialist tropical plant nurseries in your country.
What to look for: Plump, firm pieces with visible knobbly “eyes.” Avoid shrivelled or mouldy sections. Each piece should be 3–5 cm (1–2 in) long with at least one eye.
Pre-sprouting: the step most people skip
Pre-sprouting (chitting) gives you a 3–4 week head start — critical in cool climates.
- Lay rhizomes on slightly damp coco coir in a shallow tray.
- Place somewhere warm and dark — top of a fridge, airing cupboard, or near a heat mat. Target: 27–30°C (80–86°F).
- Mist lightly every few days. After 2–4 weeks, pale yellow sprouts 1–3 cm (0.5–1 in) long appear on the eyes.
Do not pre-sprout in full light — warmth, not light, triggers the buds.
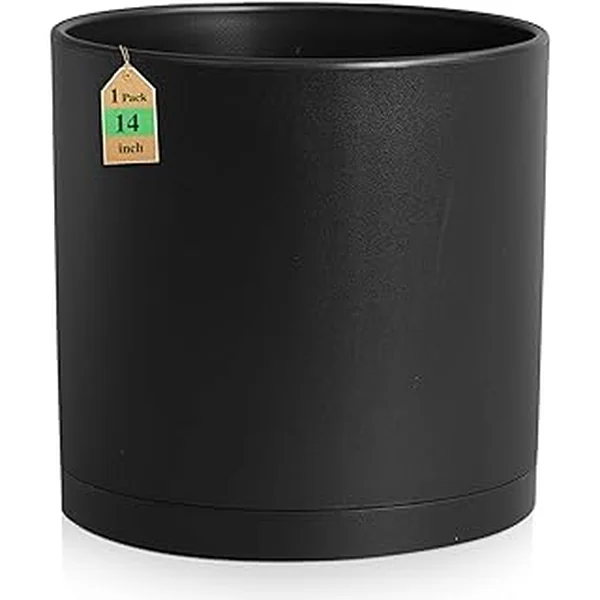
Choosing your pot
Turmeric rhizomes multiply sideways and fill a container edge-to-edge. A pot that is too shallow is the most common reason home-grown turmeric yields small, thin roots.
Minimum dimensions: 30 cm (12 in) deep × 35–45 cm (14–18 in) wide for 2–3 sections.
Material: Terracotta retains heat well. If you need to move the pot indoors for cold snaps, use a plastic nursery pot — it is far lighter.
Drainage holes are non-negotiable. Turmeric roots rot fast in waterlogged soil.
The right soil mix
Turmeric grows best in loose, well-drained, slightly acidic soil (pH 5.5–7.0).
A reliable container mix:
| Component | Proportion | Purpose |
|---|---|---|
| Good-quality peat-free potting mix | 50% | Base nutrition and moisture retention |
| Coarse perlite or horticultural grit | 30% | Drainage, prevents waterlogging |
| Homemade compost or worm castings | 20% | Long-term slow nutrition |
Avoid heavy clay soils — they compact, drain poorly, and rot the rhizomes. The mix should feel light and crumbly. Pre-wet before planting so it is evenly moist throughout.
Planting depth and orientation
Depth: Plant each rhizome section 5 cm (2 in) deep, measured from the top of the rhizome to the soil surface. In very warm climates or if using a heat mat, 3–4 cm (1.5 in) is fine.
Orientation: Eyes facing up. Planting sideways or eyes-down delays emergence by 2–3 weeks.
Spacing: Multiple sections in one large pot: 15–20 cm (6–8 in) apart. They will eventually meet across the pot base.
Water gently to settle the soil, then place in a warm spot. The rhizome does not need constant moisture before it sprouts.
Light requirements
Turmeric is a dappled-light plant — in nature it grows beneath a forest canopy, not in open fields.
- Outdoors: Morning sun with afternoon shade, or 4–6 hours of filtered light under open tree canopy.
- Indoors: Bright south or west-facing windowsill, or 30–45 cm (12–18 in) under a full-spectrum LED grow light on a 14-hour timer.
- Avoid: Harsh midday sun, which scorches the large paddle-shaped leaves.
Heat: the most critical factor
If turmeric has one absolute requirement, it is warmth.
Target range: 24–32°C (75–90°F) during the day; nights should not drop below 18°C (65°F) for sustained periods.
What happens below threshold:
- Below 21°C (70°F): growth slows noticeably.
- Below 15°C (59°F): the plant enters dormancy or the rhizomes may rot.
- Frost: kills the plant outright.
Practical heat strategies for cooler climates:
- Start indoors 6–8 weeks before your last frost date.
- A seedling heat mat raises the root zone 5–10°C (9–18°F) above room temperature during pre-sprouting.
- Move pots outside only after nights reliably stay above 18°C (65°F); bring them back in before the first forecast frost.
- A conservatory, greenhouse, or heated polytunnel adds 4–6 extra weeks at either end of the season.
Watering through the season
Turmeric likes consistent moisture — not wet, not dry. Think of its native monsoon conditions: regular rain that drains freely rather than pools.
Watering guide by growth stage:
| Stage | Moisture level | Frequency |
|---|---|---|
| Pre-emergence (planted but not sprouted) | Barely moist | Every 7–10 days |
| Active shoot and leaf growth | Evenly moist top 5 cm (2 in) | Every 2–4 days depending on heat |
| Peak summer | Consistently moist, never dry | Every 1–3 days in heat |
| Late season (leaves yellowing) | Reduce gradually | Every 5–7 days |
| Post-senescence | Stop watering | None until harvest or storage |
Water deeply until it drains from the base, then let the top 2–3 cm (1 in) dry slightly before the next watering. Standing water in a saucer will rot the roots.
Feeding your plant
Turmeric is a moderate feeder across its long season.
- At planting: Mix a balanced slow-release fertilizer into the top 10 cm (4 in) of soil.
- Monthly (May–August): Half-strength liquid balanced feed (10-10-10 or seaweed-based).
- From September: Stop feeding. Excess nitrogen at this stage promotes leaf growth at the expense of root size.
The 9–10 month growing season
Understanding the full arc helps you plan ahead. This is a long game.
Approximate timeline (indoor start, temperate climate):
| Month | What is happening |
|---|---|
| Late February–March | Pre-sprout rhizomes indoors at 27–30°C (80–86°F) |
| April | Plant sprouted rhizomes in containers indoors |
| Late May–June | Move outdoors once nights stay above 18°C (65°F) |
| June–August | Rapid above-ground growth; lush 60–90 cm (24–36 in) tall leafy stems |
| September | Growth slows; energy moves into rhizome development |
| October–November | Leaves yellow and die back — harvest window opens |
In tropical climates (USDA zones 9–11), turmeric can be grown in the ground year-round, with rhizomes left in place and harvested as needed.
How to harvest turmeric
The signal: Leaves fully yellow, stems collapsing — the rhizomes are at maximum size. Do not harvest early: a partly green October harvest yields far less than a fully died-back November harvest.
Harvesting method:
- Stop watering the plant 1–2 weeks before you intend to dig, to firm up the soil slightly and make the rhizomes easier to extract.
- Tip the pot onto its side on a tarp or work surface. Slide the entire root ball out.
- Break the soil away from the rhizome cluster by hand or with a wooden skewer.
- Separate the new season’s rhizomes (bright orange-yellow, firm) from the original mother rhizome (darker, sometimes a bit woody).
- Rinse under cold water to remove remaining soil.
- Set aside the best-looking sections (1–2 eyes per piece) as seed stock for next year’s planting. Refrigerate them wrapped in a barely damp cloth, or store in coco coir in a cool spot above 10°C (50°F).
Curing and drying your roots
Fresh turmeric can be used immediately in cooking — grated into curries, blended into golden milk, or added to smoothies. It will keep in the fridge for 2–3 weeks, or wrap tightly and freeze for up to 6 months.
To make ground turmeric powder, you need to cure the roots first:
- Boil or steam: Cook cleaned rhizomes in boiling water for 45–60 minutes until a skewer passes through with slight resistance. This gelatinises the starch, sets the colour, and speeds drying.
- Peel (optional): Produces a cleaner powder. Use gloves — fresh turmeric stains skin and fabric bright yellow.
- Slice: Cut into 3–5 mm (0.1–0.2 in) coins to speed drying.
- Dry: Spread on a dehydrator tray at 50–60°C (120–140°F) for 5–7 days until the pieces snap cleanly, or use an oven at its lowest setting with the door slightly ajar.
- Grind: Blitz in a spice grinder. Sieve for a fine powder and store in an airtight jar away from light.
Home-cured turmeric has stronger flavour, brighter colour, and higher curcumin content than most commercial powder.
Turmeric vs ginger: key differences
If you have grown ginger, you already know most of what you need. The method is nearly identical — the differences that matter:
| Factor | Ginger | Turmeric |
|---|---|---|
| Family | Zingiberaceae | Zingiberaceae |
| Ideal temperature | 21–27°C (70–80°F) | 24–32°C (75–90°F) |
| Growing season | 8–10 months | 9–10 months |
| Cold sensitivity | Moderate | High — very sensitive |
| Pot depth needed | 25–30 cm (10–12 in) | 30+ cm (12+ in) |
| Light preference | Bright indirect | Bright warm indirect |
| Harvest signal | Same — leaves yellow | Same — leaves yellow |
| Curing process | Not required for fresh use | Boil + dry for powder |
The practical takeaway: if your ginger does well, grow turmeric in the same conditions but keep temperatures a little higher and plan for 2–4 extra weeks of season.
Common problems and fixes
| Problem | Likely cause | Fix |
|---|---|---|
| Rhizome planted but no sprouts after 6 weeks | Sprout-inhibited rhizome or too cold | Source organic rhizomes; confirm soil temperature above 24°C (75°F) |
| Yellowing leaves in midsummer | Overwatering, nutrient deficiency, or too cold | Check drainage; apply balanced liquid feed; move to warmer position |
| Leaves scorched and crispy at edges | Too much direct afternoon sun | Move to dappled light or add shade cloth |
| Mushy rhizomes at harvest | Root rot from waterlogging | Ensure pot has drainage holes; reduce watering; improve soil drainage next season |
| Tiny thin rhizomes at harvest | Pot too small, harvested too early, or not enough heat | Use deeper wider pot; wait for full leaf die-back; maintain 24°C+ (75°F+) |
| Leaves pale and slow-growing | Not enough light or too cool | Move closer to light source; check night temperatures |
Watch: growing turmeric video guide
A visual walkthrough pairs well with the steps above — search YouTube for “growing turmeric at home” or “Curcuma longa container growing” for current practical guides from growers in your climate zone.
Conclusion
Turmeric rewards patience and two non-negotiables: organic rhizomes and consistent heat. Get those right and the long season takes care of itself. By November you will have a harvest of fresh golden roots from a plant you started from a single knobbly piece in spring.
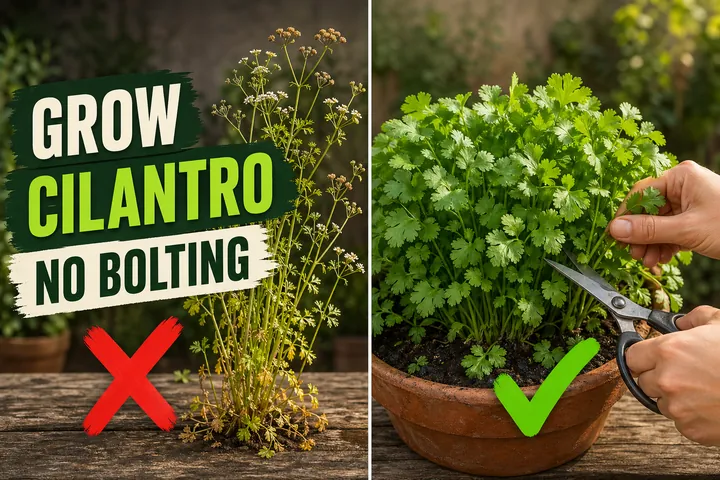
If you are new to edibles, grow a pot of basil or garlic alongside — shorter-season crops that build the daily habits turmeric’s longer timeline rewards.
Use the Tazart app to set watering reminders and track the 9-month season — useful for a crop where the most important growth is happening out of sight below the soil.
Highly recommended
The supplies that make this guide work

Tazart is an Amazon Associate — we earn from qualifying purchases at no extra cost to you. Thank you for helping us keep these guides free.
Frequently asked questions
Can I grow turmeric from store-bought roots?
Sometimes — but it's unreliable. Most supermarket turmeric is treated with a sprout inhibitor to extend shelf life, which means the eyes may never wake up no matter how warm and moist you keep them. Your far better option is to buy certified organic turmeric rhizomes labelled specifically for planting from a seed supplier or garden centre. Organic roots from a natural food store are also usually untreated and sprout well. If you do try a supermarket root, choose a plump one with visible knobby growth buds and pre-sprout it for 2–3 weeks in a warm dark place before committing to a pot.
How long does turmeric take to grow at home?
Turmeric has one of the longest growing seasons of any edible you can grow at home: 9 to 10 months from planting to harvest. You plant in spring (or indoors 6–8 weeks before last frost), the shoots emerge in 4–6 weeks, the plant grows tall leafy stems all summer and into autumn, and you harvest when the leaves yellow and die back — usually October or November. This long season is the main reason turmeric is challenging in cool climates: it simply needs more frost-free months than most of the UK, Canada, and northern US can reliably offer outdoors.
What pot size do I need to grow turmeric?
Use a pot that is at least 30 cm (12 in) deep and 35–45 cm (14–18 in) wide per planting section. Turmeric rhizomes multiply sideways, spreading outward from the mother rhizome across the full base of the container. A pot that is too shallow restricts downward root growth and chokes off new rhizome formation; a pot that is too narrow means the expanding colony runs out of room by mid-summer and the harvest is tiny. If you're container-growing in a cold climate and need to bring the pot indoors, use a sturdy plastic nursery pot inside a decorative outer planter — terracotta is beautiful but very heavy.
Does turmeric need full sun or shade?
Turmeric wants bright, warm indirect light rather than harsh midday sun. In its native tropical habitat it grows as an understorey plant beneath a forest canopy — it is used to dappled light, not open-field sun. Outdoors, a position that gets morning sun and afternoon shade, or filtered light through trees, is ideal. Indoors, a bright south or west-facing windowsill works, or a spot 30–45 cm (12–18 in) under a full-spectrum LED grow light. The heat matters far more than the light intensity: turmeric stalls completely below about 18°C (65°F) and thrives between 24–32°C (75–90°F).
How do I know when turmeric is ready to harvest?
The plant tells you when it is ready: the leaves and stems yellow, then brown, then collapse and die back to the soil. This typically happens in October or November, 9–10 months after planting. Do not try to harvest early for a bigger yield — the rhizomes are still growing right up until senescence, and an early dig will reward you with small, thin roots. Once the top growth is fully brown, wait one more week, then gently dig or tip out the entire pot and separate the golden-orange rhizomes from the soil and roots.
How do I cure and dry fresh turmeric after harvest?
Curing converts raw turmeric into the shelf-stable spice form. Boil or steam the cleaned rhizomes for 45–60 minutes until a skewer goes through easily, then dry them in a single layer at 50–60°C (120–140°F) in a food dehydrator or low oven for 5–7 days until they are hard and snap cleanly. Once dry, grind in a spice or coffee grinder for ground turmeric powder. Fresh (uncured) rhizomes can also be used immediately like fresh ginger — grated into curries, golden milk, or smoothies — and will keep in the refrigerator for 2–3 weeks or frozen for up to 6 months.
Is growing turmeric similar to growing ginger?
The method is almost identical — both are tropical rhizomes in the Zingiberaceae family, both need loose well-drained soil, consistent moisture, warm temperatures, and a long frost-free season. The key differences are that turmeric needs more heat (ideally 24–32°C / 75–90°F versus ginger's comfortable 21–27°C / 70–80°F), and its growing season is roughly 2 months longer than ginger's. Turmeric is also slightly more sensitive to cold snaps and takes longer to show above-ground growth after planting. If you have successfully grown ginger at home, turmeric is the logical next step — just plan for a longer, warmer season.