Edible
How to Propagate Rosemary from Cuttings (Roots in 3–4 Weeks)
Take a 10–15 cm (4–6 in) softwood rosemary cutting in spring, strip the lower leaves, and root in water or potting mix. Full step-by-step guide with timing and fixes.
On this page
- Quick answer
- When to take rosemary cuttings
- Selecting the right stem
- Step-by-step: preparing the cutting
- Water vs. soil rooting: which is better for rosemary?
- Rooting hormone: optional but worth it
- Transplant timing and technique
- Common failures and how to fix them
- After potting: first-year care
- Related reading
- A note on variability
Watch the visual walkthrough
Grow Lavender & Rosemary from Cuttings! (Easy & FREE!)
Want to fill your garden with the beauty and fragrance of lavender and rosemary? In this video, I'll show you how to easily ...
Rosemary is one of the easiest Mediterranean herbs to propagate from cuttings, and one cutting from your existing plant can become a full new shrub by the end of the season. You don’t need a greenhouse, a misting bench, or any special equipment.
This guide walks you through exactly which stem to pick, how to strip and prepare it, whether to root in water or soil, and when to pot it up — plus the most common reasons rosemary cuttings fail and how to fix them.
Quick answer
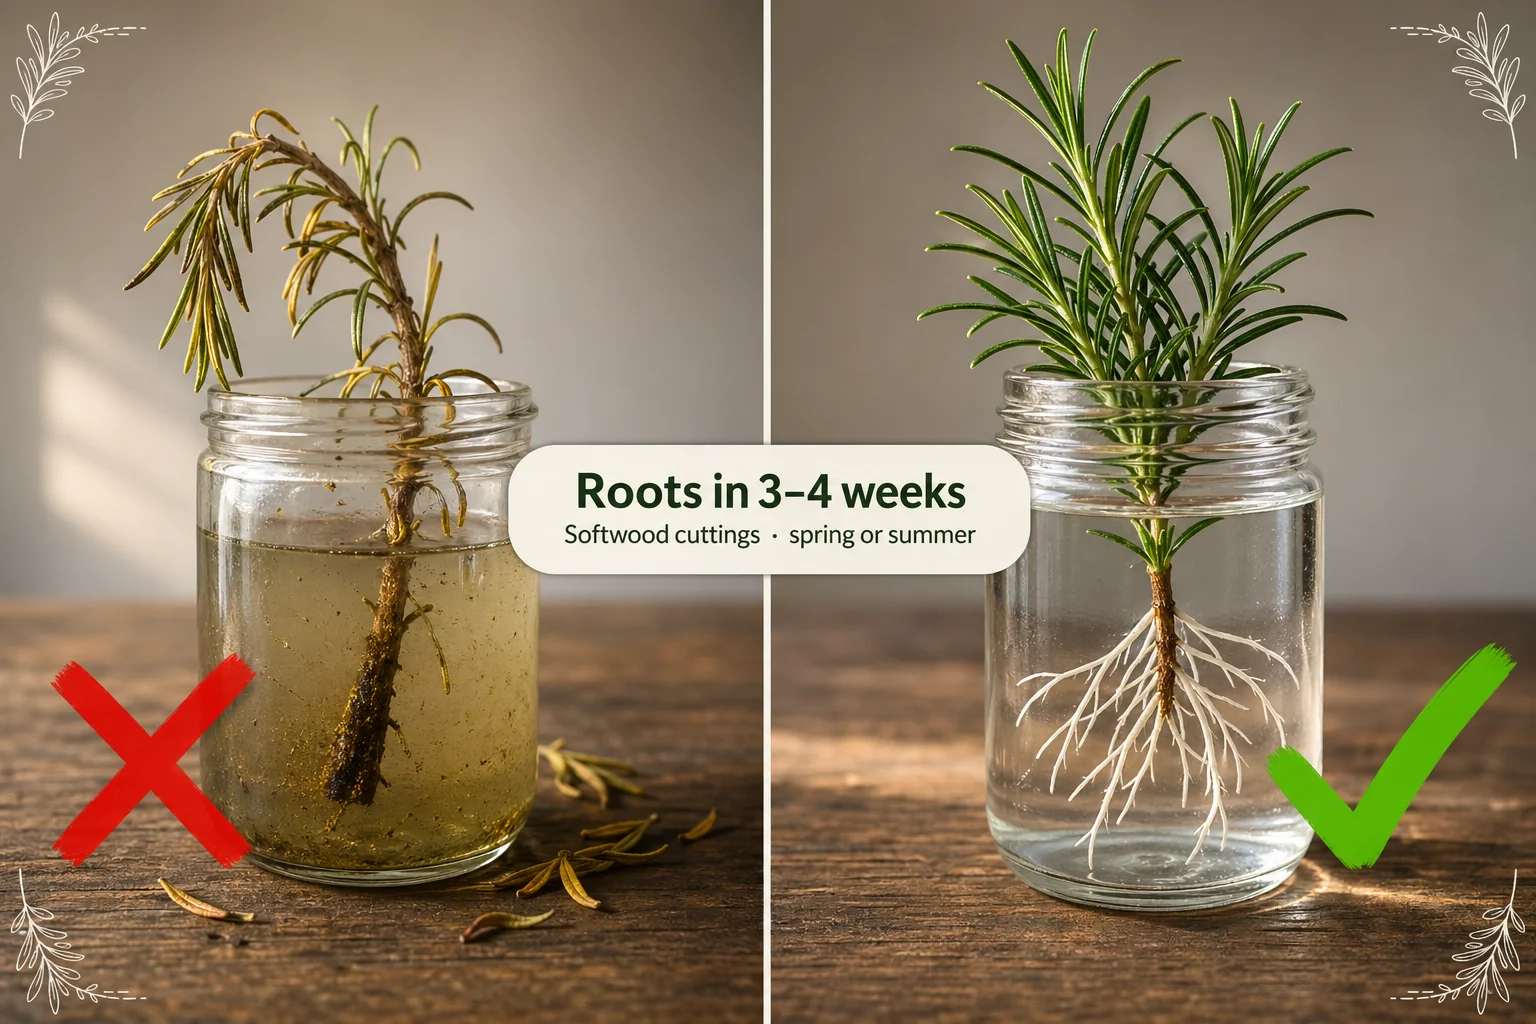
Take a 10–15 cm (4–6 in) softwood stem tip from a healthy rosemary plant in late spring or early summer. Cut just below a node, strip all needles from the bottom 5–6 cm (2 in), optionally dip in rooting hormone, then stand it in clean water or insert it 3–4 cm (1.5 in) into a perlite-and-compost mix. Keep it at 18–24°C (65–75°F) in bright indirect light. White roots appear in 3–4 weeks in water, 4–6 weeks in soil. Pot into gritty terracotta once roots hit 3–5 cm (1–2 in).
When to take rosemary cuttings
Timing is the single biggest variable in whether a rosemary cutting roots or rots.
Best window: late spring to early summer (May–June in the Northern Hemisphere). At this point the plant is producing fresh, soft new growth — flexible green stems that are biologically primed to form roots. This is called softwood.
Second-best window: late summer (August–September). By then the new growth has firmed up but is not yet fully woody. These semi-hardwood cuttings take longer to root (5–8 weeks) but are more robust once they do.
Avoid: cuttings from fully brown, woody stems. Rosemary rarely produces roots from old wood. If you snap a stem and it snaps cleanly without bending, it’s too woody to propagate reliably.
Indoors or in pots, rosemary can produce suitable new growth at other times of year — but success rate drops sharply outside the spring-to-summer window.
Selecting the right stem
Not every stem on a rosemary plant is suitable for propagation. Here’s what to look for:
- Green and pliable, not brown and stiff. The tip should bend a little before it snaps.
- Non-flowering. Stems currently in flower are putting energy into reproduction, not root production. Snap off the flowers and let the stem put out a fresh soft shoot, or choose a vegetative (leafy, flowerless) stem.
- 10–15 cm (4–6 in) long. Long enough to give you a bare stem section underground plus a good leaf cluster above.
- From a healthy parent plant. Avoid cuttings from a plant that’s been drought-stressed, overwatered, or showing disease. A stressed mother plant produces stressed cuttings.
Take 2–3 cuttings per session. Rosemary propagation typically runs a 60–80% success rate even under good conditions, so having backups means you end up with at least one strong rooted plant.
Step-by-step: preparing the cutting
1. Sterilize your tools
Wipe scissors or bypass pruners with rubbing alcohol or a 10% bleach solution. Rosemary is susceptible to fungal infections, and a contaminated blade is a fast track to a rotted cutting.
2. Make the cut
Find a non-flowering stem tip with 10–15 cm (4–6 in) of green growth. Cut at a 45-degree angle, 0.5–1 cm (0.25 in) below a node — the point where a leaf or set of needles meets the stem. The angled cut exposes more cambium tissue, which is where roots emerge.
Do not crush the stem. A bypass cut (two blades crossing) is clean; an anvil cut (blade pressing against a flat plate) bruises the stem and invites rot.
3. Strip the lower leaves
Remove all needles from the bottom 5–6 cm (2 in) of the cutting. This is the section that will sit in water or be buried in soil. Any leaf left in contact with water or soil will rot within 3–5 days, feeding bacterial growth that kills the cutting before roots can form.
Leave the top cluster of needles intact — they are the photosynthetic engine that keeps the cutting alive while roots develop.
Water vs. soil rooting: which is better for rosemary?
Both methods work. The right choice depends on what you want to learn and what you have available.
| Water propagation | Soil/perlite propagation | |
|---|---|---|
| Time to first roots | 3–4 weeks | 4–6 weeks (invisible) |
| Success indicator | Visible white roots | New leaf growth at tip |
| Failure mode | Bacterial rot if water not changed | Drying out or overwatering |
| Transplant shock | Moderate — roots adapt from water to soil | Low — roots already in substrate |
| Beginner-friendliness | High — you can see what’s happening | Medium — requires faith |
Water propagation is the easier starting point because you can see roots forming. The main mistake is neglecting to change the water — stagnant water loses oxygen and grows bacteria within 5–7 days.
Soil/perlite propagation produces roots that are already adapted to a solid substrate, which means less transplant shock when you pot up. A 50/50 mix of perlite and potting compost is the standard medium — it holds just enough moisture without becoming waterlogged.
Water propagation: step by step
- Fill a clean, clear glass jar with room-temperature water — filtered or tap water that has sat for 30 minutes to off-gas chlorine.
- Stand the stripped cutting in the water so the bare stem section is submerged to a depth of 3–5 cm (1–2 in). The needle-bearing tip should stay above the waterline.
- Place the jar in bright indirect light at 18–24°C (65–75°F). A windowsill that gets morning sun (east or south-facing) is ideal. Avoid direct afternoon sun — it heats the water and encourages algae.
- Change the water every 5–7 days. Pour out, rinse the jar, refill. This is the single most important maintenance step.
- After 2–3 weeks, check the submerged stem end for tiny white root nubs. Let them grow to 3–5 cm (1–2 in) before potting.
Soil/perlite propagation: step by step
- Mix equal parts perlite and potting compost (or use a purpose-made cutting compost). Moisten until just damp — squeeze a handful and only a drop of water should come out.
- Fill a small pot 10–12 cm (4–5 in) wide with the mix. Make a pencil-width hole 3–4 cm (1.5 in) deep to avoid knocking off rooting hormone when you insert the cutting.
- Insert the bare stem section, firm gently around the stem.
- Cover loosely with a clear plastic bag or upturned clear plastic bottle to hold humidity. Don’t let the plastic touch the leaves — leave an air gap.
- Place in bright indirect light at 18–24°C (65–75°F). Check every 2–3 days; if the surface feels dry, mist lightly with a spray bottle.
- After 4–6 weeks, look for new leaf growth at the tip — that’s your signal roots have formed. Tug gently: if the cutting resists, it’s rooted.
Rooting hormone: optional but worth it
Rooting hormone contains synthetic auxins (usually indole-3-butyric acid, IBA) that mimic the plant’s own root-triggering signals and concentrate them at the cut end.
For spring softwood cuttings, rooting hormone shortens the timeline by roughly 5–7 days and bumps success rate from around 70% to 85–90%. For semi-hardwood or late-summer cuttings, the difference is more dramatic — it can be the difference between 40% and 80% success.
How to use it:
- Powder form: dip the wet cut end into the powder, tap off the excess, insert into the pre-made hole. Do not jam the powdered tip directly into the substrate — it knocks the powder off.
- Gel form: coat the bottom 1–2 cm (0.5 in) of bare stem. Gel adheres better to rosemary’s slightly oily surface than powder does.
- Liquid form: dilute per label instructions and soak the cut end for 5 minutes, then pot immediately.
Do not use more than the label says. Excess IBA causes callusing without rooting.
Transplant timing and technique
Getting transplant timing right is what separates a cutting that thrives from one that wilts and dies within a week of potting.
For water-rooted cuttings:
- Wait until roots are 3–5 cm (1–2 in) long with at least 2–3 visible branches off the main root.
- Roots shorter than 2 cm (0.75 in) are too immature to anchor in soil.
- Roots longer than 8 cm (3 in) are over-adapted to water and struggle to make the switch.
Potting up:
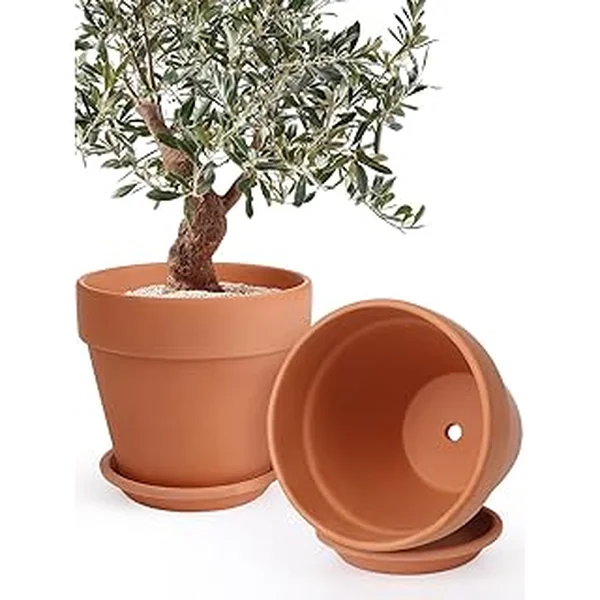
- Choose a terracotta pot 10–12 cm (4–5 in) wide with drainage holes. Unglazed terracotta breathes and wicks moisture — the best pot type for rosemary at every life stage.
- Fill with Mediterranean herb mix, or 2 parts potting soil + 1 part perlite + 1 part coarse horticultural sand.
- Make a hole, lower the roots in gently without bending them, backfill, and firm lightly.
- Water thoroughly until water drains from the bottom, then don’t water again until the top 2–3 cm (0.75–1 in) of soil is dry.
- Place in the brightest spot you have — at least 6 hours of direct sun per day. Supplement with a full-spectrum grow light if you’re indoors in autumn or winter.
Keep the newly potted cutting slightly more moist than usual for the first 10–14 days while roots adapt, then switch to normal rosemary watering rhythm (dry out between waterings).
A free plant care app like Tazart can set a watering schedule for your new cutting and adjust it automatically for your local weather — useful if you’re running multiple cuttings at different stages.
Common failures and how to fix them
| Symptom | Likely cause | Fix |
|---|---|---|
| Cutting sits for 4+ weeks with no roots | Taken from woody brown stem; room too cool (under 16°C / 60°F) | Retry with a soft green tip; move to a warmer spot at 18–24°C (65–75°F) |
| Stem turns mushy below the waterline | Leaves left submerged; water not changed | Strip every submerged leaf; change water every 5 days; trim rotted section and retry |
| Water turns cloudy or green within 3 days | Submerged leaves decaying; algae from direct sun on jar | Remove leaves below waterline; move jar out of direct sun; switch to an opaque container |
| Cutting roots in water but wilts after potting | Roots over 8 cm (3 in) — over-adapted to water | Tent with a clear bag for 10–14 days after potting to hold humidity while adapting |
| No new growth at tip after 6+ weeks in soil | Failed to root, or root rot from overwatering | Tug gently — if no resistance, it hasn’t rooted; check for mushy base and retry with fresh cutting |
| Leaves turn yellow or drop | Low light; cold drafts; sudden transplant stress | Move to brighter location; keep above 16°C (60°F); reduce watering stress during adjustment |
| Rooted cutting in soil looks healthy but grows very slowly | Not enough light; over-fertilizing too soon | Hold off on fertilizer for 4 weeks after potting; ensure 6+ hours of direct sun |
After potting: first-year care
Once your cutting is established in its pot:
| Task | When |
|---|---|
| First water | When top 2–3 cm (0.75–1 in) of soil is dry — check with a finger |
| First fertilizer | 4 weeks after potting; half-strength liquid herb feed once a month in spring/summer |
| First prune | Pinch soft tip growth after 8 weeks to encourage branching — never cut into bare wood |
| Move outdoors | Once nights stay above 4°C (40°F); harden off over 7–10 days |
A single cutting grown this way will reach harvestable size — full stems suitable for cooking — by mid-summer if started in spring. By the following year it will look like an established shrub.
For a full care guide covering light, soil, watering, and overwintering the mature plant, read how to take care of a rosemary plant.
Related reading
- How to take care of a rosemary plant — the long-term playbook for keeping the plant you just grew alive for years, covering soil, watering, pruning, and overwintering.
- How to propagate a spider plant — spider plants produce pups you simply detach, making propagation even simpler; a good contrast to rosemary’s cutting method.
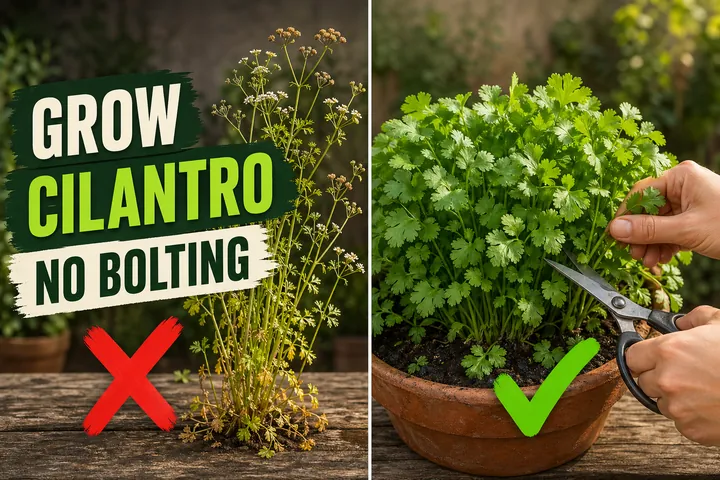
- Cilantro plant care: stop the bolting — another fast-growing edible herb to add alongside your rosemary once cuttings are established.
- Track your rosemary cuttings and get a water-change reminder every 5 days with the free Tazart plant care app.
A note on variability
Room temperature, light intensity, the time of year, and the specific rosemary variety you’re propagating all affect how quickly roots appear. The 3–4 week timeline is a reliable average at 18–24°C (65–75°F) in good light — cooler or dimmer conditions may stretch it to 6–8 weeks. Use week one to assess whether conditions are right, not as a deadline for giving up.
Highly recommended
The supplies that make this guide work


Tazart is an Amazon Associate — we earn from qualifying purchases at no extra cost to you. Thank you for helping us keep these guides free.
Frequently asked questions
How long does rosemary take to root from cuttings?
In water, the first hair-thin white roots appear in 2–3 weeks; roots long enough to pot up — about 3–5 cm (1–2 in) — take 3–4 weeks at 18–24°C (65–75°F). In potting mix, you won't see the roots, but new tip growth signals success at 4–6 weeks. Cool rooms below 16°C (60°F) can stretch the timeline to 6–8 weeks.
Can you propagate rosemary in water?
Yes. Place a stripped 10–15 cm (4–6 in) softwood cutting in a glass of clean room-temperature water, covering the bare stem section but keeping the leaves above water. Change the water every 5–7 days. Roots appear in 3–4 weeks. Water propagation is slower than soil for rosemary but lets you watch root development — useful for beginners.
Do you need rooting hormone for rosemary cuttings?
No — rosemary roots without it, especially from fresh spring softwood. Rooting hormone (IBA powder or gel) shortens the timeline by roughly one week and improves success rate on late-summer or semi-hardwood cuttings. If your previous cuttings have failed repeatedly, adding rooting hormone is the single highest-leverage fix.
When is the best time to take rosemary cuttings?
Late spring to early summer — when the plant has several centimetres of new growth but before the stems have turned woody. In most temperate climates that means May–June. Second-best window is late summer (August–September) using semi-hardwood growth, though rooting is slower. Avoid cuttings from fully woody, brown stems — they rarely root.
Why is my rosemary cutting not rooting?
The four most common causes: (1) the cutting was taken from fully woody (brown) stem rather than new soft green growth, (2) leaves were left on the submerged section and caused rot, (3) the room is too cool — below 16°C (60°F) rooting stalls completely, (4) the water was never changed and bacterial build-up suffocated the stem. Fix the matching issue and retry with a fresh cutting.
When should I transplant rooted rosemary cuttings to soil?
Move water-rooted cuttings to soil once the roots are 3–5 cm (1–2 in) long with at least 2–3 visible side branches. Roots shorter than 2 cm (0.75 in) get lost in the soil; roots longer than 8 cm (3 in) adapt poorly and often wilt dramatically after transplanting. For soil-rooted cuttings, wait for visible new leaf growth at the tip before treating it as an established plant.