Edible
How to Plant Sprouted Potatoes (Turn Kitchen Spuds Into a Crop)
Sprouted potatoes from your kitchen can grow a real crop. Here's exactly how to plant chitted seed potatoes — depth, spacing, hilling, watering, and harvest in 90 days.
On this page
Watch the visual walkthrough
GROW POTATOES from STORE BOUGHT - Save Money, Grow Food
A short visual walkthrough that pairs with the steps above.
That bag of potatoes at the back of your cupboard with long pale shoots growing out of every eye? It’s not garbage — it’s a head start on a real potato crop. Sprouted potatoes are exactly what gardeners do on purpose with seed potatoes; the only difference is that yours just did it for free on the kitchen counter.
There are a few caveats. Skip any potato that has turned green or black, since those are stressed and won’t grow well. Supermarket potatoes can work, but some are sprayed with sprout inhibitors and aren’t certified disease-free — so for a big plot, certified seed potatoes are more reliable. For a home garden bed, a couple of pots, or a few buckets, kitchen sprouted potatoes will absolutely grow you a crop.
Quick answer
Plant chitted (sprouted) potatoes 10 cm (4 inches) deep, with the sprouts facing UP, spaced 30 cm (12 inches) apart, in loose well-draining soil. Water in, then hill soil over the stems as they grow. First new potatoes in 60–70 days, full crop in 90–100 days.
Can you plant a sprouted potato from the supermarket?
Short answer: yes, with a couple of caveats.
Supermarket potatoes weren’t grown to be replanted, but the biology is the same. If a kitchen potato is firm and pushing strong purple-green sprouts (called chits), it will grow when you plant it. Two things to watch out for:
- Sprout inhibitors. Some supermarket potatoes are treated with chemicals like CIPC to stop them sprouting in storage. The fact that yours has already sprouted means the treatment has worn off — but inhibited potatoes can still chit slowly and weakly.
- Disease. Supermarket spuds aren’t certified disease-free. Late blight (the disease that caused the Irish potato famine) is the main concern. Risk is low for one or two plants in a home garden, but if you grow a serious plot, buy certified seed potatoes.
For a home garden bed, balcony pot, or a fabric grow bag, sprouted kitchen potatoes are a great free starting point.
What you’ll need
- Firm sprouted potatoes with healthy chits (skip green, black, mushy, or shrivelled spuds)
- A sunny spot — at least 6 hours of direct light per day
- Loose, well-draining soil (garden bed, raised bed, deep container, or grow bag at least 30 cm (12 in) deep)
- A trowel or small shovel
- Compost or aged manure (optional but helpful)
- Watering can
Step-by-step: planting chitted potatoes
1. Pick firm sprouted potatoes
Sort through the bag and keep only potatoes that:
- Feel firm (not soft or rubbery)
- Have short, fat, purple-green chits — those are strong sprouts
- Have no green skin and no black rot
Discard any potato that is green, black, mushy, or has sprouts so long and pale they look like white spaghetti — those grew in the dark and snap off too easily.
2. (Optional) Cut large potatoes into seed pieces
Small sprouted potatoes — egg-sized or smaller — are best planted whole.
Larger potatoes can be cut into chunks. Each chunk needs:
- At least 2 healthy eyes (chits) per piece
- A piece roughly the size of a large walnut
After cutting, lay the pieces cut-side up on a tray and leave them for 24 hours. The cut surface dries and forms a tough callous, which stops the piece rotting once it hits damp soil.
3. Prepare deep, loose soil
Potatoes form the new tubers above the seed potato along the buried stem, so the soil below and above each one needs to be loose enough for tubers to swell.
- In a bed: dig a trench 15 cm (6 in) deep and loosen the bottom another 10 cm (4 in). Mix in a couple of handfuls of compost.
- In a container: use a deep pot, bucket, or grow bag (≥ 30 cm (12 in) deep) with drainage holes. Fill with potting mix mixed 1 part compost to 4 parts mix.
Skip heavy fresh manure — it can encourage scab on the skins.
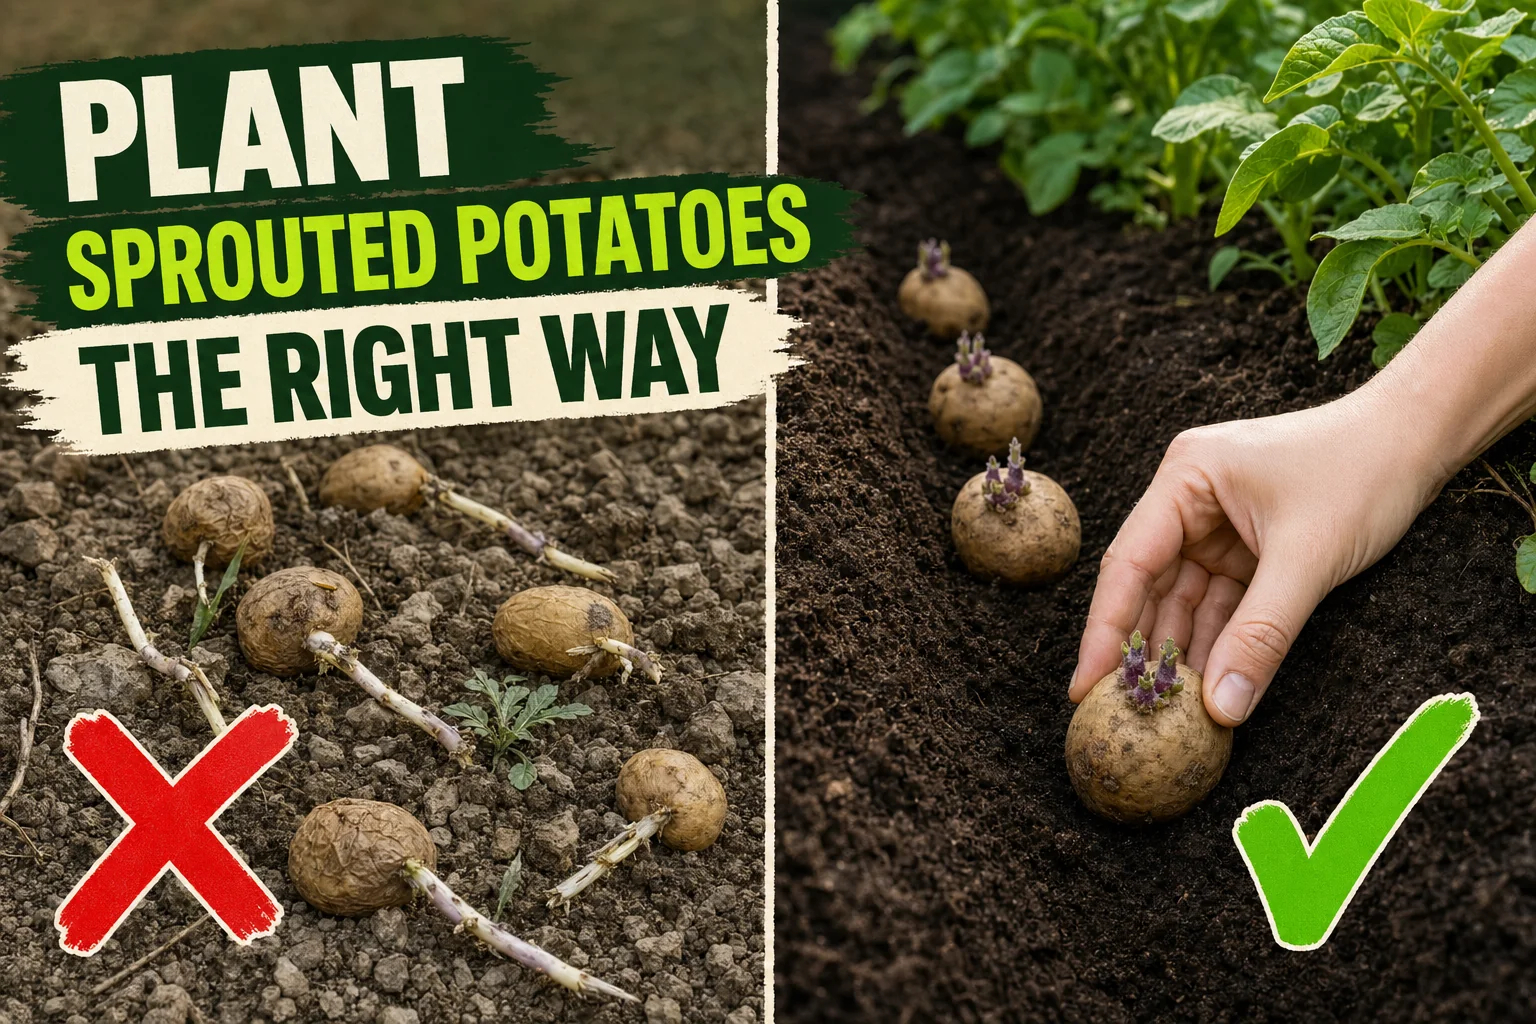
4. Plant 10 cm (4 in) deep, sprouts UP
Place each sprouted potato in the trench with the chits pointing straight up and the widest, flattest side down. Cover with about 10 cm (4 inches) of soil.
Why 10 cm (4 in) matters: shallow planting is the #1 cause of small home crops. Tubers form along the stem above the seed potato, so depth = yield room.
5. Space them 30 cm (12 in) apart
Each plant needs room to spread roots and tubers without competition. Space sprouted potatoes 30 cm (12 inches) apart in the row, and leave 60–75 cm (24–30 in) between rows if you’re planting more than one row.
In a bucket or grow bag, plant 1–2 small seed potatoes per 40 L (10 gallon) container — no more.
6. Water in, then hill as they grow
Water the trench gently right after planting to settle the soil — drips coming out the bottom of a container is the signal to stop.
Once the green stems push 15–20 cm (6–8 in) above the surface, hill them: mound loose soil or compost up around the stems, leaving only the top 5 cm (2 in) of leaves exposed. Repeat every 2 weeks while the plants grow. Hilling does three things:
- Creates more buried stem = more tubers
- Stops new tubers from poking out and turning green in sunlight
- Suppresses weeds around the plants
Care after planting
Once the plants emerge, potatoes are mostly hands-off. Three things matter:
| Task | When |
|---|---|
| Water | 2–3 cm (0.75–1 in) of water per week (rain + watering combined). More in heat. |
| Hill | Every 2 weeks until the plants flower |
| Fertilize | Avoid heavy nitrogen — it grows leaves at the expense of tubers |
Heavy nitrogen feeds (lawn fertilizer, fresh manure, lots of fish emulsion) make beautiful bushy tops and disappointing crops. A balanced slow-release fertilizer or a tomato fertilizer is much better.
A free plant care app like Tazart can hold the watering schedule for each container, adjust it for your local weather, and ping you on Apple Watch when the next hilling is due — useful if you’re growing several buckets.
When and how to harvest
Two harvest paths:
New potatoes (60–70 days): once the plants are in flower, you can carefully reach into the side of the hill and grab a few small new potatoes. The plant keeps growing — you’re just stealing some early. Eat these within a week; they don’t store well.
Main crop (90–100 days): wait until the foliage yellows, flops over, and starts dying back on its own. Stop watering for the last 1–2 weeks — this firms the skins. Then dig up the whole plant on a dry day with a fork, working from outside the hill in so you don’t spear the tubers.
Cure the harvested potatoes in a single layer in a warm (15–20 °C (59–68°F)), dry, dark spot for 1–2 weeks. Curing toughens the skins so they store. Then move them to a cool, dark, dry place. Never store in the fridge — the cold turns the starch sugary.
Common mistakes to avoid
- Planting green or black potatoes. Green = stressed (high solanine), black = rotting. Both grow weakly or not at all. Compost them instead.
- Snapping off the long pale sprouts. Long, pale shoots from a dark cupboard are fragile and break off if you toss the potatoes around. Handle gently — once the chits are gone, the potato has to start over, and it has less energy left to do it.
- Planting too shallow. Tubers form above the seed potato. 10 cm (4 in) deep is the minimum, plus hilling.
- Skipping the hilling. No hilling = fewer tubers, plus the ones near the surface go green from sun exposure and become inedible.
- Watering right at harvest time. Wet soil at harvest = thin-skinned, easily-bruised potatoes that rot in storage. Stop watering 1–2 weeks before you dig.
- Replanting potatoes in the same bed every year. Diseases build up in the soil. Rotate the bed at least every 3 years.
Troubleshooting
| Symptom | Likely cause | Fix |
|---|---|---|
| Leaves yellow much earlier than 90 days | Underwatering, or early blight | Water deeply once a week; remove yellow leaves; if brown spots with rings appear, treat as blight |
| Tubers have brown patches inside (hollow heart) | Inconsistent watering during a growth spurt | Even out watering — aim for 2–3 cm (0.75–1 in) a week, not feast-or-famine |
| Rough, scabby patches on the skins | Scab — common in alkaline or freshly manured soil | Don’t add fresh manure; keep soil pH around 5.5–6.5; rotate the bed |
| Slugs eating leaves and tubers | Damp shaded ground, mulch left wet | Reduce mulch around stems; use beer traps or copper tape; harvest promptly when foliage dies |
| Brown blotches on leaves, white fuzz under leaves, blackening stems | Late blight (the famine disease) | Cut and bag (don’t compost) infected foliage immediately; harvest tubers; don’t replant potatoes here next year |
| Tiny crop despite healthy-looking plants | Too shallow, no hilling, or too much nitrogen | Plant deeper (10 cm (4 in) + hill), and switch off nitrogen-heavy feeds |
Watch: planting sprouted potatoes
A short visual walkthrough pairs well with the steps above. If you’re a visual learner, watch a quick tutorial like How to Plant Sprouted Potatoes on YouTube and then come back to follow the timing in this guide.
Related reading
- How to plant potatoes in a bucket — same chitting + hilling rules, just adapted for a 40 L container on a balcony.
- How to plant garlic cloves — another kitchen-staple-to-crop guide that uses very similar depth and spacing logic.
- How to plant sprouted onions — turn another sprouted kitchen bulb into fresh greens or a new crop.
- Scan the next plant you bring home with the free Tazart plant identifier and let it set up the watering and hilling schedule for you.
A note on conditions
Every garden is different. Variety, climate, soil type, container depth, light, and your local weather all change how fast sprouted potatoes grow and how much they yield. Use the depths, spacings, and timings above as a strong starting point — then adjust based on what your plants actually do in week three or four. That’s how every good potato grower learns.
Highly recommended
The supplies that make this guide work


Tazart is an Amazon Associate — we earn from qualifying purchases at no extra cost to you. Thank you for helping us keep these guides free.
Frequently asked questions
Can you plant a sprouted potato from the supermarket?
Yes — supermarket potatoes that have sprouted can grow a real crop, especially in a home garden. The catch is that some are treated with sprout inhibitors (which is why kitchen sprouts can be slow or weak), and supermarket spuds aren't certified disease-free, so they carry a small blight risk. Skip any potato that is green, black, or shrivelled, and stick to firm tubers with strong purple-green chits.
How deep do you plant sprouted potatoes?
Plant them about 10 cm (4 inches) deep, with the sprouts pointing up. Shallow planting is the most common reason home growers get tiny crops — the new tubers form along the buried stem above the seed potato, so depth matters. Then you keep mounding (hilling) soil over the stems as the plant grows, which creates even more space for tubers.
Should sprouts face up or down when planting potatoes?
Sprouts should face up. The chits (those short purple-green shoots) become the stems, and they grow toward the surface. Planting them upside down still works, but the plant wastes energy turning itself around and emerges later and weaker.
How long do sprouted potatoes take to grow?
First new potatoes are ready about 60 to 70 days after planting, when the plants flower. A full main crop takes 90 to 100 days, harvested once the foliage yellows and dies back. Cure the harvested tubers in a dark, dry, warm spot for 1 to 2 weeks before storing.
Do you need to cut sprouted potatoes before planting?
Only if they are large. A small sprouted potato (egg-sized or smaller) is best planted whole. Larger ones can be cut into chunks with at least 2 healthy eyes per piece, then left cut-side up for 24 hours so the cut surface dries and forms a callous — that callous prevents rot once it hits damp soil.
Are green sprouted potatoes safe to plant?
Avoid them. Green potatoes contain solanine, and while a green potato can technically still grow, the tuber is usually stressed and produces a weaker plant. Black, mushy, or fully shrivelled potatoes also rot in the soil instead of growing. Plant only firm, healthy-looking sprouted spuds.