Edible
How to Plant Sprouted Garlic (Honest Guide to Realistic Results)
Sprouted garlic from your pantry is still good — and you can plant it. Here's exactly how to grow garlic greens indoors or outdoors, and what to expect.

On this page
- Quick answer
- Is sprouted garlic still safe to eat?
- Why plant a sprouted clove instead of tossing it?
- What you’ll need
- Step-by-step: planting sprouted garlic cloves
- What to realistically expect — the honest part
- Care after planting
- Soil vs water — which is better?
- Common mistakes to avoid
- Troubleshooting
- Watch: planting a sprouted garlic clove
- Related reading
- A note on conditions
Watch the visual walkthrough
Watch This Before You Plant Garlic
Get free seeds, shipping, and returns: https://www.epicgardening.com/greenhouse/ Grab some garlic this season: ...
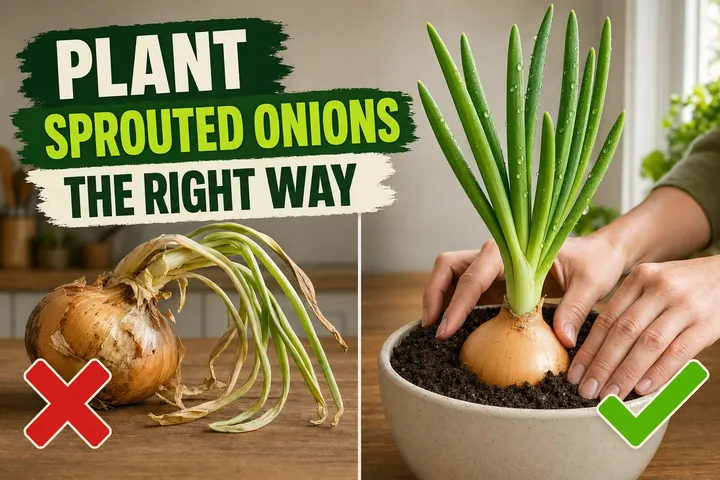
You opened the pantry, picked up that head of garlic, and found half the cloves pushing out tiny green tails. Good news: it’s still perfectly fine to eat, and even better, it’s also the easiest thing in the world to plant. You don’t need seeds, you don’t need fancy gear, and you don’t need to wait for a planting season.
What you do need is honesty about the result. Most store-bought sprouted cloves won’t give you a full new garlic bulb — they’ll give you a steady supply of fresh garlic greens, which look and taste like delicate scallions. That alone is worth the five minutes of effort.
This guide walks you through it: choosing cloves, soil, depth, light, watering, harvest, and the realistic outcome.
Quick answer
Yes, you can plant sprouted garlic — and you should. Break the bulb into firm cloves, plant each one point-up, 5 cm (2 in) deep, in moist potting soil with the green tip just peeking out. Place in 6+ hours of bright light and water once. You’ll have fresh garlic greens to snip in 3 to 4 weeks. A full new bulb is unlikely from supermarket garlic, but the greens are reason enough.
Is sprouted garlic still safe to eat?
Yes. A green shoot growing out of a clove is just garlic doing what nature designed it to do — wake up and grow. It’s not a sign of spoilage and not a food safety risk. The clove may taste a touch bitter or sharper than a fresh one because the shoot is pulling sugars from the bulb, but it’s safe to chop, crush, and cook normally.
A clove you should not eat is one that has gone soft, slimy, hollow at the centre, or has visible white or grey fuzz. Those bulbs have started rotting, and no amount of replanting will save them — straight to the compost.
If you only mind the slight bitterness, the trick is to slice each clove in half lengthwise and lift out the green germ in the middle before crushing or mincing. The remaining flesh tastes mostly like normal garlic.
Why plant a sprouted clove instead of tossing it?
A sprouted clove is a clove in growth mode. Tossing it wastes a head start commercial growers actively pay for: the bulb has already broken dormancy and is throwing out roots and leaves on its own energy reserves. Drop it in soil and you skip about two weeks of the plant’s life cycle.
Replant a single sprouted bulb’s worth of cloves and you get, on average:
- A handful of fresh garlic greens within 3 to 4 weeks — the same flavour you’d buy as expensive scallions or chives
- 2 to 3 cuttings of greens from each clove before it tires out
- A small live plant on your windowsill or balcony with no special seed-starting kit
- A long-shot chance at a small bulb if you plant outdoors in fall
The cost is one bulb you were going to throw away. The return is real food and a tiny bit of joy every time you snip greens off it.
What you’ll need
- One firm sprouted garlic bulb (skip mushy, mouldy, or hollow-centred ones)
- A pot at least 15 cm (6 in) wide and 15 cm (6 in) deep with drainage holes — or a garden bed
- General-purpose potting mix — not garden soil, which compacts in pots
- A sunny windowsill, balcony, or outdoor spot with 6+ hours of direct light
- Watering can or cup
- Optional: a small amount of compost or balanced organic feed for week 4
That’s the entire shopping list. No fertilizer or grow lights needed for the first month, although a basic LED grow light bar makes a real difference indoors past week 6.
Step-by-step: planting sprouted garlic cloves
1. Pick firm sprouted cloves
Break the bulb gently apart with your hands — don’t peel the cloves. Squeeze each one between your thumb and forefinger. It should feel firm, not soft. The papery skin should still be intact. A green shoot of any length, from 1 cm (0.5 in) to 10 cm (4 in), is fine.
Reject any clove that:
- Feels soft or rubbery
- Has fuzzy white or grey mould
- Has a brown or hollow centre when you peel back the outer skin
- Smells off — rotten garlic is unmistakable
Plant the biggest, plumpest cloves for the best chance of decent shoots. The wisp-thin inner cloves are better used in cooking.
2. Prepare the pot or bed
Fill your pot with potting mix to about 3 cm (1 in) below the rim. Tap the pot on the table once or twice to settle the mix — don’t pack it down. Roots need air pockets to breathe. If you bought a stiff peat-free mix, mix in a handful of perlite to keep it loose.
Planting in a garden bed instead? Loosen the soil to a depth of 20 cm (8 in) and fork in a generous double handful of compost. Avoid beds where you grew onions, leeks, or other alliums in the last three years — they share soil-borne diseases.
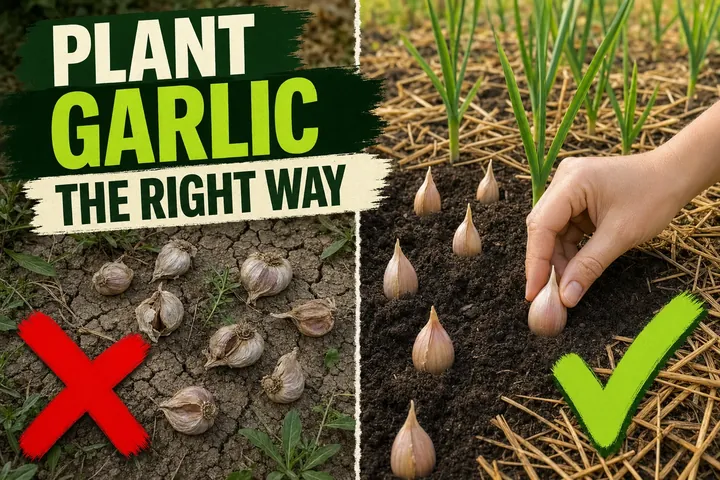
3. Make planting holes 5 cm (2 in) deep
Use your finger, a pencil, or a chopstick to make holes 5 cm (2 in) deep and 10–15 cm (4–6 in) apart. In a standard 15 cm (6 in) pot you can fit 3 cloves comfortably. A 25 cm (10 in) pot will hold 5 to 6. Crowding more in produces thinner greens, not more harvest.
In raised beds, set rows about 25–30 cm (10–12 in) apart so you can weed without stepping on the cloves.
4. Plant each clove point-up
Drop each clove into its hole with the pointed end (where the green shoot is emerging) facing up and the flat root end down. This is the single step beginners get wrong most often. Upside-down cloves still grow, but they waste energy curling around to find the surface and produce small, twisted shoots that look stressed for life.
If a clove is fat and round and you genuinely can’t tell which end is up, look for two clues: the slightly pointier tip, and any tiny brown root hairs at the base.
5. Backfill and firm gently
Cover each clove with soil so the green tip just peeks above the surface, or sits 1 cm (0.5 in) below the surface if the shoot is still very short. Press the surface lightly with your fingers — just enough to hold the cloves upright when you water. Don’t pack it down hard.
6. Water it in once
Pour water slowly around the base of each clove until you see drips coming out of the drainage holes. This first watering does two jobs: it closes air gaps around the roots and signals the plant that it’s safe to grow.
After this, let the top 2–3 cm (0.75–1 in) of soil dry out before watering again. Garlic hates sitting in wet soil — it’s the #1 cause of replanted cloves rotting in the first two weeks.
7. Place it in 6+ hours of bright light
Set the pot somewhere it’ll get at least 6 hours of direct or very bright indirect light per day:
- Indoors: south- or west-facing window — east-facing works in summer
- Outdoors: full sun, sheltered from heavy wind for the first week
If you only have a north-facing window or a shady balcony, the green tops will still grow — just paler and floppier — but a new bulb won’t have a chance.
8. Harvest the garlic greens
Snip the green shoots with kitchen scissors when they reach 15–20 cm (6–8 in) tall. Leave 3 cm (1 in) above the clove so it keeps regrowing. Each clove will reliably give you 2 to 3 cuttings of greens before its energy reserve runs out.
Use them anywhere you’d use scallions, chives, or fresh garlic: scrambled eggs, fried rice, soups, salads, compound butter, focaccia, omelettes. The flavour is milder than a raw clove and brighter than dried garlic.
What to realistically expect — the honest part
This is the section most “regrow your kitchen scraps” articles skip. Here’s the truthful picture:
Almost certain: you’ll get fresh garlic greens within a month. They’re tasty, free, and a small joy in the kitchen.
Likely: the cloves will produce 2 to 3 rounds of greens, then slowly tire out and either go dormant or die back. The original clove inside the soil will look shrivelled by then.
Unlikely: you’ll get a full new multi-clove garlic bulb out of a sprouted supermarket clove planted indoors. Garlic needs a long cold spell (4–8 weeks below 10°C / 50°F) to trigger proper bulb division — a process called vernalization. Pantry temperatures don’t qualify, and most store-bought garlic is a softneck variety bred for milder climates.
Best case: if you transplant the cloves to an outdoor bed in autumn, six weeks before your first hard frost, they get the cold period naturally. You may then harvest a small bulb the following summer. Even so, the bulbs tend to be smaller than what you’d get from purpose-grown seed garlic, because supermarket garlic varieties aren’t matched to your climate.
That’s the honest tradeoff. The greens are the real win. The bulb is a maybe-bonus, not the main event.
Care after planting
Sprouted garlic is famously low-maintenance. Three small habits make a noticeable difference:
| Task | When |
|---|---|
| Water | When the top 2–3 cm (0.75–1 in) of soil is dry — usually every 5–8 days indoors |
| Fertilize | After 4 weeks, a balanced organic liquid feed every 2 weeks if you want bigger greens |
| Rotate the pot | Quarter turn weekly so shoots grow upright instead of leaning toward the window |
| Trim brown tips | Snip browning tips off any leaf — they won’t recover, but the rest of the shoot stays usable |
A free plant care app like Tazart holds the watering schedule for you, adjusts it for your local weather, and pings your phone when it’s time. Useful if you’ve got more than one or two pots going.
Soil vs water — which is better?
Short answer: soil. You can park a sprouted clove in a shallow dish of water to coax out short greens for a couple of weeks, but the clove will collapse the moment its internal energy reserve is gone, because there’s no soil for the new roots to feed from.
Soil gives the roots somewhere real to anchor and a way to keep feeding the plant after the original clove’s reserves run out. You’ll get longer, thicker harvests of greens, and you preserve the slim chance of a small bulb later.
Water-only is a fun science-class demo. Soil is how you eat off it.
Common mistakes to avoid
- Burying the green shoot. The growing tip wants air. Buried fully, it can rot or stall. Leave the tip just at the surface.
- Planting soft or mouldy cloves. They won’t grow, and the mould can spread to neighbouring cloves. Compost them.
- Watering on a fixed schedule. Garlic needs the soil to dry between waterings. A weekly waterer kills more replanted cloves than anything else.
- Using garden soil in a pot. It compacts hard and chokes the roots. Always use bagged potting mix in containers.
- Skipping drainage holes. No drainage = standing water = rot in days. Drill holes if you must.
- Planting cloves upside-down. A two-second mistake that costs you a third of your harvest size.
- Expecting a full bulb from indoor pantry garlic. Set the expectation correctly and the greens feel like a win, not a disappointment.
- Crowding cloves into a small pot. Less than 10 cm (4 in) between cloves means thin, pale greens and no chance at a bulb.
Troubleshooting
| Symptom | Likely cause | Fix |
|---|---|---|
| No green growth after 2 weeks | Clove rotted (overwatered) or planted upside-down | Lift, check the clove; if firm, replant the right way up; water less |
| Pale, floppy shoots | Not enough light | Move to a sunnier window or add a basic LED grow light |
| Shoots grow then suddenly collapse | Soft rot — clove is finished | Pull and compost; the sprouted clove ran out of energy |
| Yellow tips on otherwise green shoots | Underwatering or salt build-up | Water deeply once until it runs out the bottom; flush the pot every 2 months |
| Tiny black flying insects in soil | Fungus gnats from staying too wet | Let the soil dry out fully; top with a 1 cm (0.5 in) layer of dry sand |
| Bulb is one solid round at season’s end | Missed vernalization (no cold period) | Normal indoors — eat the round, plant outdoor cloves in fall next time |
| Tall flower stalk shoots up | Hardneck-type clove producing a scape | Snap the scape off at the base — eat it stir-fried; bulbs size up better afterwards |
Watch: planting a sprouted garlic clove
A short visual walkthrough pairs well with the steps above. If you’re a visual learner, watch a quick tutorial like How to Plant Garlic Cloves on YouTube and then come back to follow the depth and orientation rules in this guide.
Related reading
- How to plant garlic cloves the right way — the full fall-planting guide if you want to grow garlic for actual bulbs, not just greens.
- How to plant onions that have sprouted — garlic’s close cousin, and the same depth and orientation rules apply.
- How to plant sprouted potatoes — another pantry rescue that turns into real food with very little effort.
- Set up watering and harvest reminders with the free Tazart plant care app so your sprouted garlic never gets forgotten on a shelf again.
A note on conditions
Every kitchen and garden is different. Light levels, pot size, soil mix, the variety of garlic you bought, room temperature, and your local climate all change how a sprouted clove behaves. Treat the depths, spacings, and timings above as a strong starting point and adjust based on what your pot actually does in week two — that’s how every good kitchen gardener learns.
Highly recommended
The supplies that make this guide work
Tazart is an Amazon Associate — we earn from qualifying purchases at no extra cost to you. Thank you for helping us keep these guides free.
Frequently asked questions
Can you plant sprouted garlic from the grocery store?
Yes — every clove with a green shoot is a planting candidate. Be honest about the outcome, though: supermarket garlic is usually a softneck variety chosen for shipping, and a single sprouted clove rarely produces a full new bulb head. What it will reliably produce is fresh garlic greens — tender, scallion-like shoots you can snip into eggs, soups, and salads.
Is sprouted garlic still safe to eat?
Yes. Sprouted garlic is completely safe to eat as long as the clove itself is firm and not mouldy. The flavour turns slightly bitter and the green shoot can taste sharp, so cooks often slice the green stalk out before crushing the clove. Soft, slimy, or fuzzy cloves should be composted, not eaten.
How long does sprouted garlic take to grow?
You'll see new growth within 5 to 10 days of planting, and harvestable garlic greens about 3 to 4 weeks in. A full new bulb takes 8 to 9 months and only forms reliably if the clove gets a cold period (vernalization) — which is why outdoor fall planting outperforms an indoor pot for bulb production.
Will sprouted garlic produce a new bulb?
Honestly, usually not — at least not a normal multi-clove bulb. Most store-bought sprouted cloves planted indoors produce a 'round' (one solid undivided bulb) or just leafy greens. Plant outdoors in fall and you'll get better odds, but even then, supermarket garlic is rarely matched to your climate, so bulbs end up smaller than what you'd get from real seed garlic.
Should you plant sprouted garlic in soil or water?
Soil. You can sit the base of a clove in a shallow dish of water to grow short greens for a couple of weeks, but the clove will collapse once its energy reserve is gone. Soil gives the roots somewhere to anchor and the plant a way to keep feeding itself, so you get longer harvests of greens — and a chance at a small bulb later.
Do sprouted garlic cloves need full sun?
They prefer 6+ hours of direct or very bright indirect light per day. A south- or west-facing windowsill works indoors. Less light still produces green shoots — they'll just be paler and floppier — but a real bulb won't form without strong sun.
What do you do with garlic that has sprouted?
You have three sensible options. (1) Plant the cloves to grow fresh garlic greens for the kitchen — the easiest win. (2) Use them in cooking now, slicing the green germ out of the centre if you find it bitter. (3) Compost any clove that's gone soft. Don't bin a firm sprouted bulb — it's the cheapest crop you'll ever grow.