Flowers
How to Plant Iris Bulbs (Bearded, Dutch, and Reticulated)
How to plant iris bulbs the right way: bearded rhizomes sit on top, Dutch and reticulated bulbs go 8 cm (3 in) deep. Full depth, spacing, and timing.
On this page
- Quick answer
- Three iris types — at a glance
- What you’ll need
- Step-by-step: planting bearded iris rhizomes
- Step-by-step: planting Dutch and reticulated iris bulbs
- Spacing summary
- Dividing bearded iris (every 3–4 years)
- Fall planting timing for Dutch and reticulated
- Common mistakes to avoid
- Troubleshooting
- Watch: planting iris bulbs and rhizomes
- Related reading
- A note on conditions
Watch the visual walkthrough
How to Plant Iris Correctly for Long Term Success
A short visual walkthrough that pairs with the steps above.
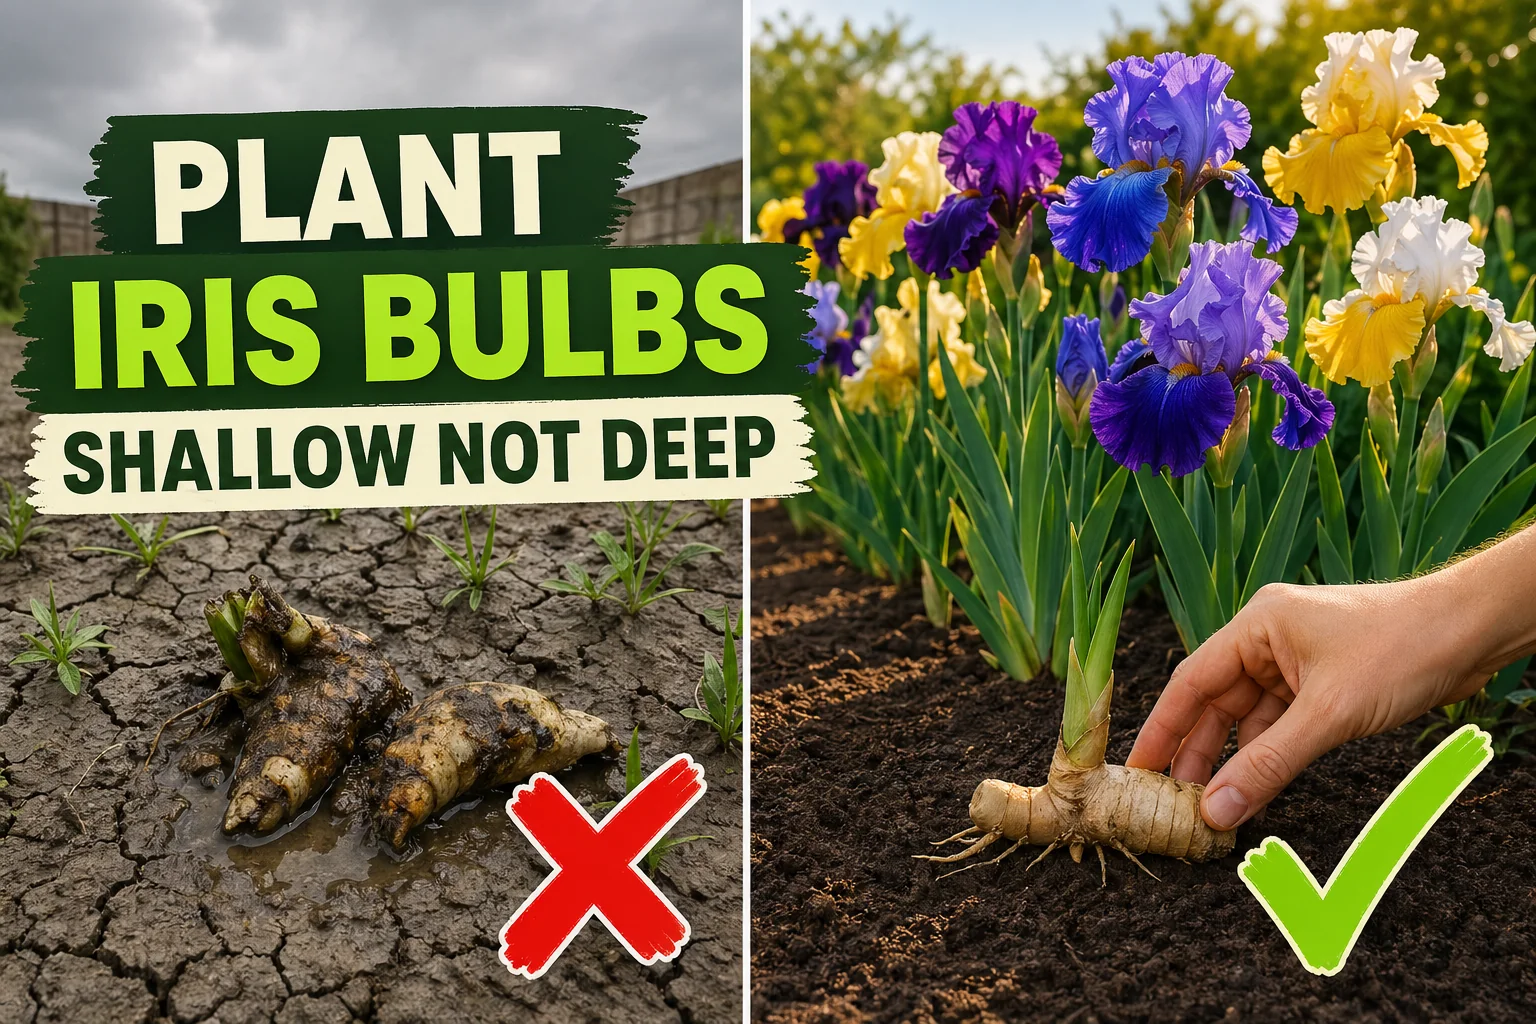
Iris is one of those plants that rewards you for life if you plant it correctly the first time — and quietly rots away if you don’t. The trick is that “iris” covers two completely different planting jobs. Bearded iris grows from a rhizome that wants to sit on top of the soil; Dutch and reticulated iris grow from true bulbs that go fully underground.
If a catalog sold you “iris bulbs” and you tried to plant them all the same way, you’d lose half of them. Here’s the right depth for each type, the spacing, the timing, and the dividing schedule that keeps a bearded iris clump blooming for decades.
Quick answer
Bearded iris (Iris germanica) grows from rhizomes — set the rhizome on the soil surface with only the roots buried, fan-side up. Dutch iris (Iris × hollandica) and reticulated iris (Iris reticulata) are true bulbs — plant them 8 cm (3 in) deep, pointed-side up, 5–15 cm (2–6 in) apart depending on size. All three want full sun and well-drained soil. Plant bearded iris in late summer; plant Dutch and reticulated bulbs in fall before the ground freezes.
Three iris types — at a glance
The single most useful thing to know before you dig is which iris you’re holding. The packaging and the planting depth are completely different.
| Type | Botanical name | Underground organ | Plant depth | Spacing | Bloom time | Mature height |
|---|---|---|---|---|---|---|
| Bearded iris | Iris germanica | Rhizome | Top of rhizome at or just above soil surface | 30–45 cm (12–18 in) | Late spring | 60–90 cm (24–36 in) |
| Dutch iris | Iris × hollandica | True bulb | 8 cm (3 in) deep | 10–15 cm (4–6 in) | Late spring / early summer | 50–60 cm (20–24 in) |
| Reticulated iris | Iris reticulata | True bulb | 8 cm (3 in) deep | 5–8 cm (2–3 in) | Very early spring | 10–15 cm (4–6 in) |
If your “bulbs” arrived as flat, knobbly, brown finger-shaped pieces with leaf fans attached — those are bearded iris rhizomes. If they arrived as rounded, papery teardrop bulbs that look like small onions or shallots — those are Dutch or reticulated iris. Plant accordingly.
What you’ll need
- Iris rhizomes or bulbs (firm, no soft spots, no fuzzy mould)
- A sunny bed with at least 6 hours of direct sun per day
- Well-drained soil — heavy, soggy clay rots iris faster than anything else
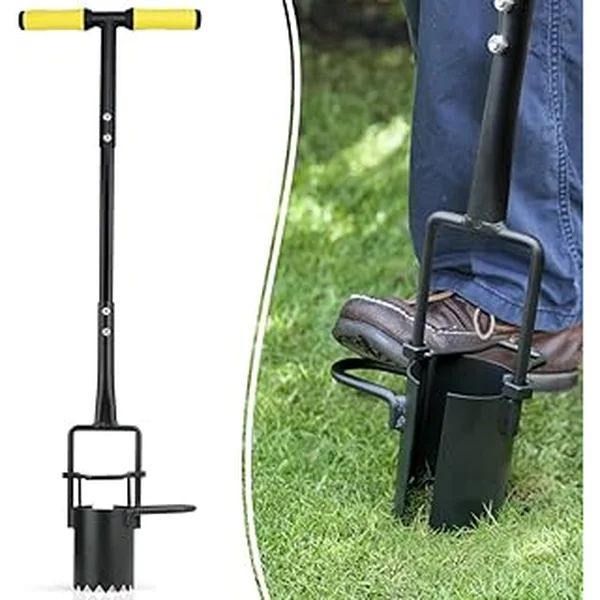
- A trowel or hand fork
- A wooden ruler or your trowel marked at 8 cm (3 in)
- Optional: bone meal or low-nitrogen bulb fertilizer
- Optional: coarse grit or sand for clay-heavy beds
That’s the whole kit. Iris are forgiving of soil and watering once they’re at the right depth — but unforgiving of one mistake (burying the rhizome) and one site problem (waterlogged ground).
Step-by-step: planting bearded iris rhizomes
1. Pick firm, healthy rhizomes
A good bearded iris rhizome feels solid like a small potato and has a small fan of healthy green leaves. Skip any that are:
- Soft or squishy anywhere along the rhizome (bacterial soft rot)
- Hollow or chambered when you press them
- Showing dark sunken patches or smell sour
- Completely dried out and lightweight
The roots hanging beneath the rhizome should be firm and pale, not black and slimy.
2. Prep loose, well-drained soil
Loosen the bed to about 30 cm (12 in) deep with a fork. Mix in a generous handful of compost per square metre. If you have heavy clay, also work in a few handfuls of coarse grit — bearded iris rhizomes will rot in a winter of wet feet faster than almost any other perennial.
A tablespoon of bone meal or a low-nitrogen bulb fertilizer worked into the soil under the rhizome is optional but pays off. Skip high-nitrogen feeds — they push leaves at the expense of flowers and encourage soft rot.
3. Build a small mound for each rhizome
This is the step that catches most beginners. Bearded iris is not buried like a tulip. Instead:
- Dig a shallow hole about 10 cm (4 in) deep and 25 cm (10 in) wide.
- Build a small mound of soil in the centre of the hole, peaking just below the surrounding soil surface.
- Set the rhizome on top of the mound, fan-side up.
- Drape the roots down both sides of the mound.
- Backfill with soil so the roots are buried but the top half of the rhizome is exposed.
You should be able to see the rhizome sitting on the soil like a half-buried sweet potato. That sun exposure is what keeps it dry, ripens the bloom buds for next year, and prevents rot.
4. Orient the fan in the direction you want growth
Bearded iris marches forward each year — new fans grow off the front (leaf end) of the rhizome, and the back end gradually exhausts itself. Point the leaf fan toward the open space in your bed. After 3–4 years the clump will have walked roughly 30 cm (12 in) in that direction.
If you’re planting three rhizomes for an instant clump, set them in a triangle 25 cm (10 in) apart with all the fans pointing outward.
5. Space rhizomes 30–45 cm (12–18 in) apart
Bearded iris multiplies aggressively. A 30 cm (12 in) spacing fills in within 2 years; a 45 cm (18 in) spacing buys you an extra year or two before the clump needs dividing. Tighter spacing crowds the rhizomes faster and triggers earlier division.
6. Water in once, then leave it alone
Water the bed thoroughly once after planting to settle the soil around the roots. Then stop watering until you see new growth or it actively rains. Bearded iris rhizomes sitting in damp soil with no foliage to transpire is the textbook setup for soft rot.
Step-by-step: planting Dutch and reticulated iris bulbs
These two are planted like any other small autumn bulb — deep, pointed-side up, in fall.
1. Plant in fall before the ground freezes
September through November is the window in most temperate gardens. The bulbs need 6–8 weeks of cool soil at 4–10°C (40–50°F) to root properly before winter dormancy. Reticulated iris is the toughest — it’ll often shrug off a light freeze even mid-planting.
2. Dig the hole 8 cm (3 in) deep
Measure from the top of the bulb to the soil surface. For Dutch iris that’s a 10 cm (4 in)-deep hole to leave room for the bulb itself. For reticulated iris (much smaller bulbs), a 9 cm (3.5 in)-deep hole.
A trench is easier than individual holes for a drift — dig a straight 10 cm (4 in)-deep trench, drop the bulbs in along it, and backfill once.
3. Place the bulb pointed-side up
The pointed (or slightly flattened) tip is where the shoot emerges. The flat bottom with the small root scar goes down. Reticulated iris bulbs are small and sometimes hard to orient — if you can’t tell, plant them sideways. They’ll find their way up within a week.
4. Space by size
- Dutch iris: 10–15 cm (4–6 in) apart in groups of 7+ for impact
- Reticulated iris: 5–8 cm (2–3 in) apart in tight drifts of 20+
Reticulated iris is short — barely 10–15 cm (4–6 in) tall — so plant it where you’ll actually see it: along path edges, at the front of borders, or in shallow pots near the door.
5. Backfill, water once, mulch lightly
Cover with loose soil, firm gently, water once to settle, and add 2–3 cm (1 in) of light mulch over the top in cold zones. The mulch buffers freeze-thaw cycles that can heave shallow bulbs out of the ground.
Spacing summary
| Type | Spacing | How it fills in |
|---|---|---|
| Bearded iris | 30–45 cm (12–18 in) | Fills in 2–4 years; needs dividing every 3–4 years |
| Dutch iris | 10–15 cm (4–6 in) | Group plantings of 7+ for clear impact |
| Reticulated iris | 5–8 cm (2–3 in) | Tight drifts of 20+ for early-spring carpets |
Dividing bearded iris (every 3–4 years)
Bearded iris is one of those rare perennials that needs dividing on a schedule. Skip it for 5+ years and the centre of the clump goes hollow, bloom drops off, and you suddenly have lots of leaves but no flowers.
The drill, done about 6 weeks after the iris finishes blooming (typically late July or August):
- Lift the whole clump with a fork. Don’t try to dig out individual rhizomes — get the whole mass.
- Hose off the soil so you can see the rhizomes clearly.
- Snap the rhizomes apart at the natural narrow joints. Each viable piece needs at least one healthy fan of leaves and a section of firm white roots.
- Discard the centre — it’s usually old, hollow, or rotten. Keep the firm, plump outer pieces.
- Inspect for iris borer holes (small round entry points, often with sawdust-like frass) and soft rot (mushy, foul-smelling tissue). Cut well past any soft area into clean white flesh, or discard the whole rhizome.
- Trim the leaf fan back to about 15 cm (6 in) tall — a tidy chevron shape. This reduces transpiration while the new roots establish.
- Let the cuts air-dry for a few hours in the shade before replanting.
- Replant the divisions on fresh mounds at 30–45 cm (12–18 in) spacing as in the planting steps above.
A divided iris clump usually skips bloom the following spring, then comes back stronger than before in year two.
Fall planting timing for Dutch and reticulated
Both Dutch and reticulated iris are autumn-planted, like tulips and daffodils. The exact window depends on your last fall frost date:
- Mild zones (USDA 7–9): Plant October to early December. The bulbs root through a long cool autumn.
- Cold zones (USDA 4–6): Plant September to mid-October, before the ground freezes. Mulch lightly after the first hard frost.
- Very cold zones (USDA 3): Plant early September or grow in pots overwintered in a cold frame.
Reticulated iris is one of the very first flowers in spring — often blooming alongside snowdrops while the ground is still half-frozen. Dutch iris blooms a month or two later, around the same time as the late tulips.
A free plant care app like Tazart can hold the planting and dividing reminders for you and adjust them to your local frost dates, which matters when you’re juggling iris alongside other fall bulbs.
Common mistakes to avoid
- Burying a bearded iris rhizome. This is mistake #1, and it almost always ends in bacterial soft rot. The top of the rhizome must be exposed to the sun. If a heavy mulch or fresh compost has covered yours, pull it back.
- Planting bearded iris in shade. They tolerate light afternoon shade but need at least 6 hours of direct sun for reliable flowering. A shaded iris clump grows lush leaves and refuses to bloom.
- Soggy soil. All three iris types rot fast in waterlogged ground. Add coarse grit or sand to clay beds, or plant on a raised berm.
- Skipping division. Bearded iris clumps go hollow in the centre after 4–5 years. Lift, divide, and replant on the 3–4 year schedule.
- Using high-nitrogen fertilizer. Lawn-style fertilizer (heavy nitrogen) pushes soft leafy growth that’s very prone to soft rot and iris borer. Use bone meal or a low-nitrogen bulb feed instead.
- Planting reticulated iris in the back of the border. They’re 10–15 cm (4–6 in) tall — at the back you’ll never see them. Tuck them along path edges, in pots, or at the very front.
Troubleshooting
| Symptom | Likely cause | Fix |
|---|---|---|
| Bearded iris rhizome turns soft and smells foul | Bacterial soft rot from being buried or sitting in wet soil | Lift, cut back to firm white tissue, dust with sulphur, replant on a mound with the top exposed |
| Sawdust-like holes and tunnels in the rhizome | Iris borer larvae | Lift in late summer, slice out infested tissue, soak healthy parts in dilute bleach, replant clean |
| Lots of green leaves but no flowers | Too much shade, overcrowded clump, or high-nitrogen feed | Move to full sun, divide if 3+ years overdue, switch to bone meal |
| Brown leaf streaks or mushy leaf bases | Iris leaf spot (fungal) or crown rot | Remove affected leaves, improve air flow, avoid overhead watering, mulch with grit not compost |
| Reticulated iris bulbs heaved out of the ground | Freeze-thaw cycles in unmulched bed | Replant 8 cm (3 in) deep and add 2–3 cm (1 in) light mulch in late autumn |
| Dutch iris bulbs rotted over winter | Wet, heavy soil that didn’t drain | Replant in a raised bed or on a berm; mix coarse grit into the planting hole |
Watch: planting iris bulbs and rhizomes
If you’re a visual learner, a short clip pairs well with the steps above. Search for How to plant bearded iris rhizomes and Dutch iris bulbs on YouTube and watch someone build the rhizome mound — once you see a bearded iris sitting half-exposed on a sunny hump of soil, the “don’t bury it” rule sticks for life.
Related reading
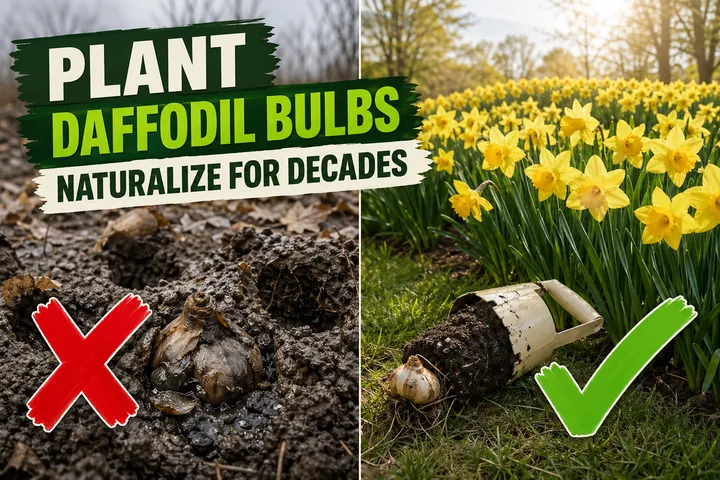
- How to plant tulip bulbs (depth, spacing and timing) — same fall window as Dutch iris, often planted in mixed drifts.
- How to plant daffodil bulbs — the easiest fall bulb to pair with reticulated iris for an early-spring layered display.
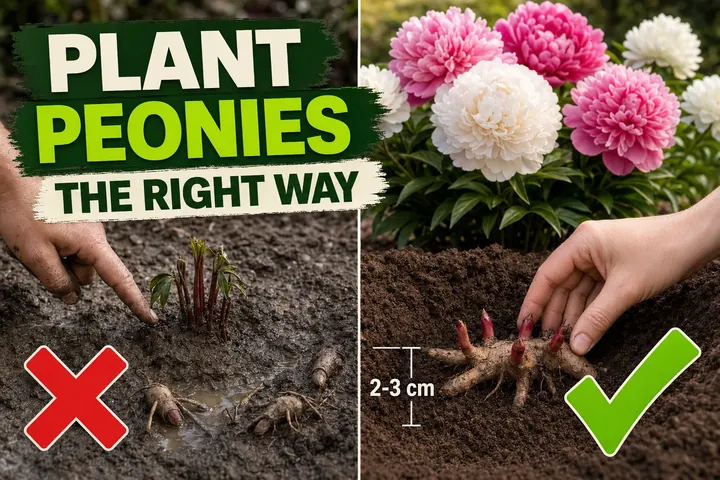
- How to plant peony bulbs — another perennial where depth makes or breaks bloom: too deep and peonies sulk for years.
- Set up planting, dividing and watering reminders for your iris and the rest of your garden with the free Tazart plant care app — it’ll keep an eye on the 3-year division clock for your bearded iris so you don’t have to.
A note on conditions
Every garden is different. Soil texture, drainage, your USDA zone, and how much direct sun a bed actually gets all change how iris behave. The depth and spacing here are starting points — watch how your first season runs, note which clumps thrive and which sulk, and adjust the next planting from there. That’s how every long-time iris grower dials in their patch.
Highly recommended
The supplies that make this guide work


Tazart is an Amazon Associate — we earn from qualifying purchases at no extra cost to you. Thank you for helping us keep these guides free.
Frequently asked questions
How deep should you plant iris bulbs?
It depends on the type. Bearded iris (Iris germanica) grows from a rhizome — the top of the rhizome should sit at or just above the soil surface, with only the roots buried. Dutch iris (Iris × hollandica) and reticulated iris (Iris reticulata) grow from true bulbs and go 8 cm (3 in) deep, pointed-side up. Burying a bearded iris rhizome is the #1 cause of rot; planting Dutch or reticulated bulbs too shallow leaves them frost-vulnerable and weakly rooted.
Are iris bulbs or rhizomes?
Both, depending on the species. Bearded iris and Siberian iris grow from rhizomes — thick horizontal stems that sit at or above the soil surface. Dutch iris and reticulated iris grow from true bulbs that go fully underground. Catalogs lump them all together as 'iris bulbs' because that's what shoppers search for, but they need very different planting depths.
Which way is up on a bearded iris rhizome?
The fan of leaves is the front and points the direction of growth — that's where new fans will emerge from. The roots hang down beneath. Lay the rhizome flat with leaves up and roots down, then bury only the roots. The top half of the rhizome should be exposed to the sun. If you accidentally cover it, scrape the soil back.
When should you plant iris bulbs?
Bearded iris rhizomes are best planted in late summer or early fall (July through September in most zones), giving them 6 weeks of warm soil to root before winter. Dutch and reticulated iris bulbs are autumn-planted like tulips and daffodils — September through November, before the ground freezes. Spring planting is possible for all three but bloom is usually delayed by a year.
How far apart should iris bulbs be planted?
Bearded iris rhizomes go 30–45 cm (12–18 in) apart so the clump has room to multiply for 3–4 years before it needs dividing. Dutch iris bulbs sit 10–15 cm (4–6 in) apart in groups. Reticulated iris bulbs are tiny — plant them 5–8 cm (2–3 in) apart in tight drifts of 20+ for the best early-spring carpet effect.
How often should you divide bearded iris?
Every 3 to 4 years, when the centre of the clump starts to thin out and bloom drops off. Lift the whole clump in late summer (about 6 weeks after flowering), snap the rhizomes apart at the natural joints, discard any soft or hollow pieces, trim leaves to a 15 cm (6 in) fan, and replant the firm outer pieces. Skipping division is the most common reason an established iris stand suddenly stops blooming.