Edible
How to Plant Green Onions (From Seed, Sets & Kitchen Scraps)
Plant green onions 0.5 cm (¼ in) deep from seed, or sets 1.25 cm (½ in) deep, spaced 2.5 cm (1 in) apart. Harvest scallions at 20–30 cm (8–12 in) in 30–80 days.
On this page
- Quick answer
- Green onion, scallion, spring onion — what’s the difference?
- Table of contents
- Why green onions are different from bulbing onions
- Method 1 — From seed
- Method 2 — From sets
- Method 3 — Kitchen scrap regrowth
- Ongoing care
- Harvesting
- Common mistakes
- Troubleshooting
- Watch: How to grow green onions
- Related reading
- A note on conditions
Watch the visual walkthrough
How To Regrow Green Onions...And Beyond!
Regrow Store-Bought Green Onions For Free! If you ever wanted unlimited Green Onions, then look no further. Also known as ...
Green onions — also called scallions or spring onions — are one of the fastest, most forgiving crops a home grower can plant. You can start them from seed, from sets (small bulbs), or by regrowing the white root ends from your last grocery run, and still be snipping fresh green tops within a few weeks.
This guide covers all three methods in full, with the care, harvest cues, and troubleshooting that separate a continuous supply from a failed scrap-jar experiment.
Quick answer
Sow green onion seeds 0.5 cm (¼ in) deep, or press sets 1.25 cm (½ in) below the surface, spaced 2.5 cm (1 in) apart in rows 15 cm (6 in) apart. No thinning needed. Keep soil moist at 15–21°C (60–70°F). Harvest when tops reach 20–30 cm (8–12 in) — roughly 60–80 days from seed, 30–40 days from sets, or 7–14 days for a first cut from kitchen scraps.
Green onion, scallion, spring onion — what’s the difference?
These names are often used interchangeably, but they refer to slightly different things depending on context:
| Name | What it usually means |
|---|---|
| Scallion | Allium fistulosum — a true bunching onion that never forms a bulb; mild, hollow round stems |
| Green onion | Common US term for any immature onion harvested young, including A. cepa sets pulled before bulbing |
| Spring onion | UK/AUS term — same as green onion; sometimes has a small round base |
| Welsh onion | Allium fistulosum — perennial, returns each year, clumps and divides easily |
For this guide, the terms are used interchangeably — the planting methods, depths, and spacings are the same regardless of which name your seed packet uses.
Table of contents
- Why green onions are different from bulbing onions
- Method 1 — From seed
- Method 2 — From sets
- Method 3 — Kitchen scrap regrowth
- Ongoing care
- Harvesting
- Common mistakes
- Troubleshooting table
- FAQ
Why green onions are different from bulbing onions
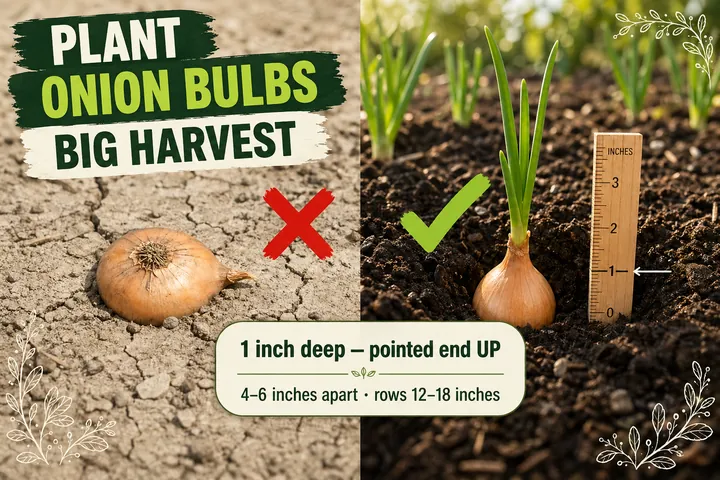
This is NOT the same as planting onion bulbs for full-size storage onions. That post covers bulbing Allium cepa sets planted pointed end up at 2.5 cm (1 in) deep, spaced 10–15 cm (4–6 in) apart, harvested 90–120 days later when the tops fall.
Green onions are planted and managed differently:
- Shallower depth: 0.5 cm (¼ in) for seed, 1.25 cm (½ in) for sets — not 2.5 cm (1 in)
- Much closer spacing: 2.5 cm (1 in) apart, not 10–15 cm (4–6 in)
- No thinning required: dense stands are normal and desirable
- Harvested young: at 20–30 cm (8–12 in) tall, not at maturity
- Multiple harvests: snip and regrow 2–4 times from the same plant
- Fast: 30–80 days instead of 90–120 days
If you’ve already grown a sprouted onion from a store-bought bulb, you know the scallion-style harvest well — the same “snip the greens and let it regrow” principle applies here.
Method 1 — From seed
Growing from seed gives you the widest variety selection (over 20 cultivars available, including Evergreen Hardy White, Parade, and Tokyo Long White) and the lowest cost per plant.
Timeline: 7–14 days to germinate → 60–80 days to first harvest.
What you’ll need
- Green onion or scallion seeds (heirloom bunching types recommended)
- Seed-starting mix or fine, well-drained potting compost
- A container at least 15 cm (6 in) deep, with drainage holes
- A sunny window or outdoor bed with 6+ hours of light
Seed planting steps
1. Prepare your bed or container. Fill to within 2.5 cm (1 in) of the rim. Water thoroughly and let it drain before sowing — wet-but-not-soggy is the target.
2. Open shallow furrows. Use a pencil, chopstick, or your fingertip to draw lines across the surface 0.5 cm (¼ in) deep, spacing rows 15 cm (6 in) apart.
3. Sow seeds 2.5 cm (1 in) apart. Drop one seed every 2.5 cm (1 in) along each furrow. Cover with the finest layer of soil — barely 0.5 cm (¼ in). Seeds deeper than 1 cm (½ in) germinate poorly.
4. Water gently. Use a mist sprayer or a watering can with a fine rose head. Heavy direct water disturbs tiny seeds and washes them together.
5. Keep moist and warm. Ideal germination temperature is 15–21°C (60–70°F). Germination takes 7–14 days. Don’t let the surface crust over and dry out during this window — thin crust is the main seed-germination killer.
6. No thinning needed. Dense seed stands are standard for scallions. They grow perfectly well shoulder to shoulder.
Succession planting tip
Sow a new small container or row every 3 weeks. Each batch reaches harvest at a different time, giving you fresh green onions continuously through the season rather than one large glut.
Method 2 — From sets
Sets are small pre-grown onion bulbs, similar to what’s described in the onion bulb planting guide — but planted shallower and much closer together for the scallion harvest style.
Timeline: 30–40 days to first harvest.
How to plant sets for green onions
1. Source small sets. Sets meant for green onion production should be no larger than 1.5 cm (½ in) in diameter. Very large sets are more prone to bolting.
2. Plant 1.25 cm (½ in) below the surface. Unlike bulbing onions (which go 2.5 cm / 1 in deep), green onion sets go shallower — the tip should just barely sit below soil level, with the top of the set nearly flush.
3. Space 2.5 cm (1 in) apart. Row spacing 15 cm (6 in). This close spacing is intentional — green onions compete well and the dense stand produces uniform upright growth.
4. Firm gently and water in. Press the soil lightly around each set. Water with a fine-head can until the soil is thoroughly moist.
5. Mulch lightly. A 1 cm (½ in) layer of fine compost or straw between rows retains moisture and prevents the soil surface from baking dry.
From sets you’ll see green shoots within 5–7 days and harvest-ready tops in 30–40 days.
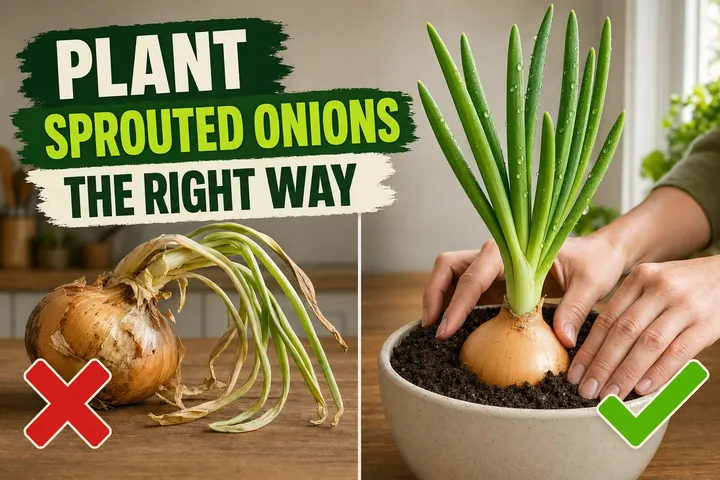
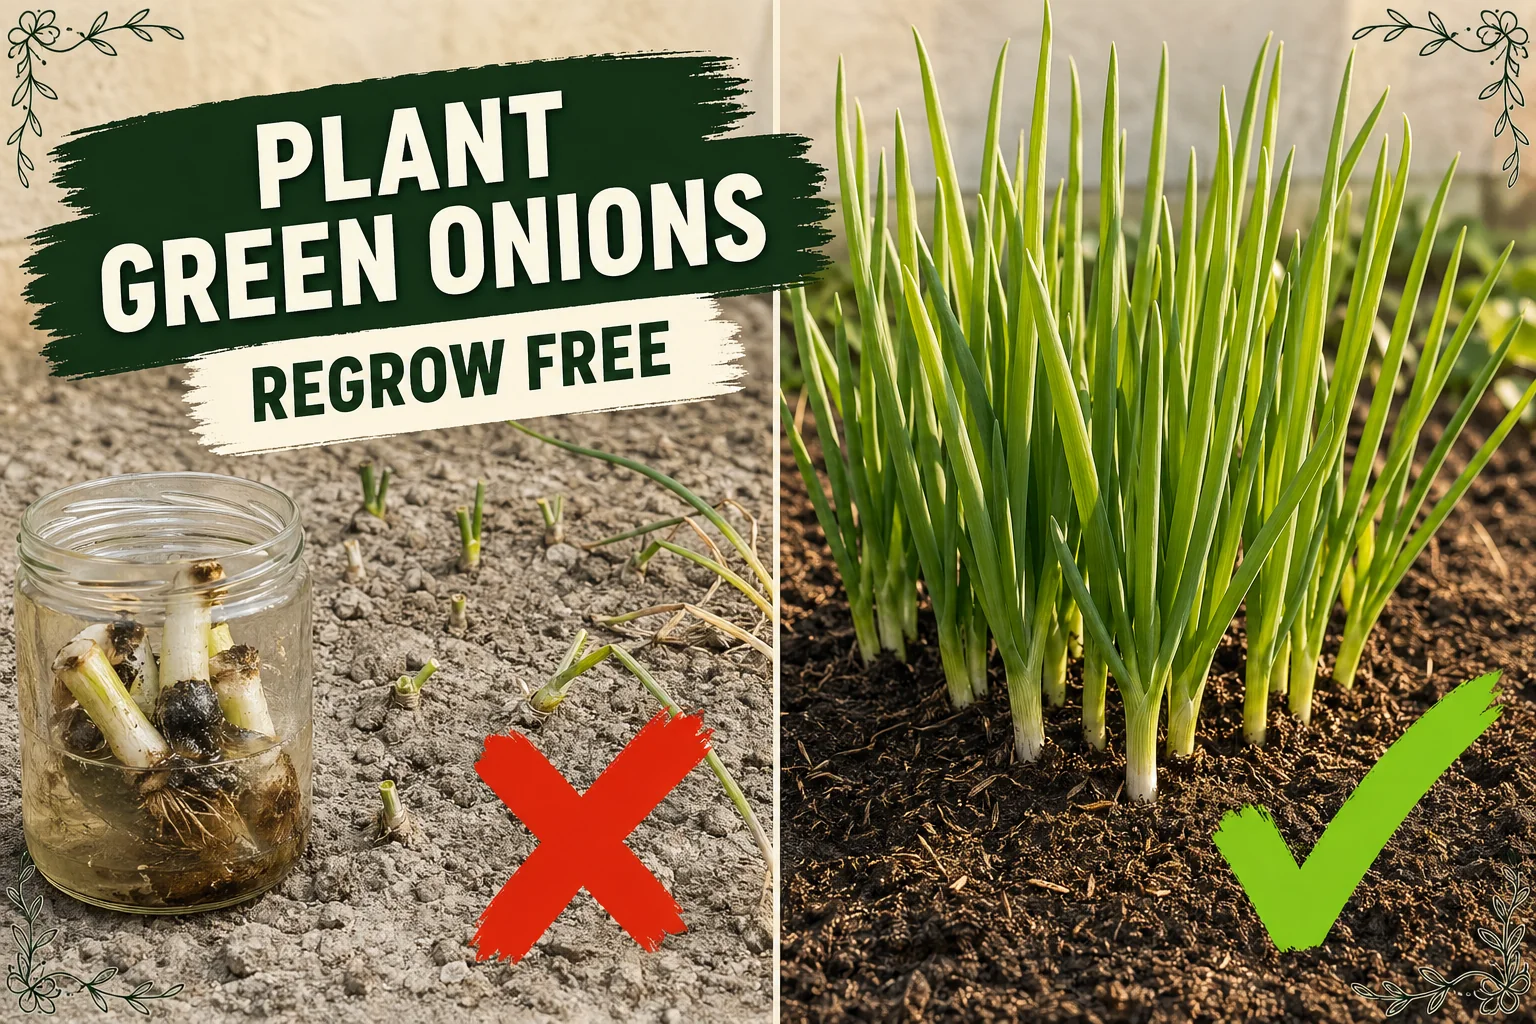
Method 3 — Kitchen scrap regrowth
This is the viral “green onions in a glass of water” trick — and it genuinely works, with one important caveat: water alone depletes the bulb’s stored energy within 2–4 cuts. Transplanting into soil after the first water-regrow extends the plant’s life significantly.
Timeline: 7–10 days for first cut from water; 3–4 more cuts once in soil.
Step 1: Save the root ends
When you use store-bought green onions, cut the tops to use in cooking and set aside the white root ends — at least 2.5 cm (1 in) of white base with the roots still attached. Dry, shrivelled, or mouldy ends won’t regrow.
Step 2: Water-regrow phase (optional but popular)
Stand the root ends upright in a glass or jar with 2.5 cm (1 in) of cool water. The roots should be submerged; the cut top should be above the waterline. Place on a bright windowsill.
- Change the water every 1–2 days (stale water grows bacteria that rot the base)
- Within 3–5 days you’ll see green shoots emerging from the cut top
- After 7–10 days the shoots are 10–15 cm (4–6 in) and ready for a first snip
Step 3: Transplant into soil for sustained harvests
After the first water-based cut — or even before it — move the root ends into soil:
- Fill a pot at least 10 cm (4 in) deep with moist potting mix.
- Make a shallow well and nestle each root end in, barely covering the roots with soil, 2.5 cm (1 in) apart.
- Water in gently and place in a spot with 6+ hours of light.
- The plant transitions from water-feeding to soil-feeding within 5–7 days.
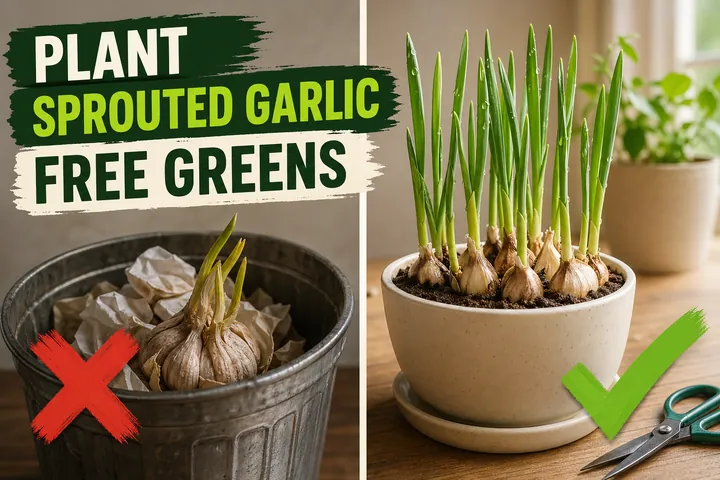
In soil, a well-lit kitchen-scrap root end produces 3–4 harvests before vigor wanes. This pairs perfectly with the trick in the sprouted onions guide — same principle, same pot.
Note on “indefinite regrowth” claims: You cannot harvest green onions indefinitely from the same root. Each cut weakens the stored energy in the white base. After 3–5 harvests from one root end, the stems become thinner and slower. Start a new batch of seeds or scraps every month for a continuous supply.
Ongoing care
Green onions are low-maintenance once established. The three things that matter most are moisture, light, and soil temperature.
Watering
Keep soil consistently moist — not soggy. The top 1–2 cm (½ in) drying out briefly between waterings is fine; letting it dry 3–4 cm (1–1.5 in) deep causes tip-browning. In containers, check every 2–3 days in warm weather.
Avoid overhead watering once tops are tall — wet foliage overnight encourages fungal issues.
Temperature
Green onions are a cool-season crop. The sweet spot is 15–21°C (60–70°F). They tolerate light frost (down to about -3°C / 27°F) and can be planted 4–6 weeks before the last frost in spring.
At temperatures above 27°C (80°F), growth slows and plants may bolt (send up a flower stalk). Plant in part shade during summer in hot climates, or switch to a heat-tolerant variety like Evergreen White Bunching.
Fertilizing
Green onions are light feeders but respond to a boost of nitrogen every 3–4 weeks. A dilute liquid organic fertilizer (fish emulsion, liquid kelp, or balanced 10-10-10 at half strength) applied every 3–4 weeks keeps growth lush and fast. Don’t over-fertilize — excessively lush tops become floppy.
Companions and rotation
Green onions grow well alongside carrots, tomatoes, and asparagus — the allium scent deters some pests. Avoid planting in beds that had onions, garlic, or leeks in the past 2–3 years to reduce risk of white rot and downy mildew.
Garlic cloves and sprouted garlic make excellent rotation partners — they occupy beds in opposite seasons from green onions in many climates.
Harvesting
When to harvest
Harvest green onions when:
- Tops are 20–30 cm (8–12 in) tall
- The white base is at least 1 cm (½ in) wide
- Leaves are firm and upright — not floppy or yellowing
Two harvest methods
Method A — Snip and regrow: Use clean scissors to cut the green tops 2.5 cm (1 in) above soil level. Leave the white base in the ground. The plant regrows from the cut point and produces another flush in 2–3 weeks. You can repeat this 2–4 times per plant.
Method B — Pull the whole plant: Grasp at the base and lift the entire plant, roots and all. This is how you get the classic spring onion with the full white root end. Good for a larger harvest; requires replanting.
Harvest-ready checklist
- Tops 20–30 cm (8–12 in) tall
- White base 1 cm (½ in) or wider
- Leaves upright, not flopping
- No flower stalk visible (if one appears, harvest immediately)
Common mistakes
- Planting seeds too deep. More than 1 cm (½ in) and germination drops sharply. Green onion seeds are tiny — they need light to reach the surface quickly.
- Overwatering kitchen-scrap stubs. The most common scrap-regrowth failure is changing water too infrequently or leaving the base sitting in 5 cm (2 in) of stagnant water. Change water every 1–2 days, or just go straight to soil.
- Expecting indefinite regrowth from scraps. Each cut weakens the stored energy. After 3–5 cuts, the base is spent. Sow new seeds rather than trying to extend a failing plant.
- Planting in shade. Green onions tolerate partial shade but they will not thrive with fewer than 4 hours of light. Pale, floppy tops are the result.
- Ignoring a flower stalk. Once a green onion bolts (sends up a flower), the base toughens and flavor turns sharp. Cut the flower off immediately and harvest the greens now — the plant won’t produce quality tops after bolting.
- Using garden soil in containers. Garden soil compacts in pots, chokes roots, and stays soggy. Use a quality potting mix for all container growing.
Troubleshooting
| Symptom | Likely cause | Fix |
|---|---|---|
| Seeds didn’t germinate after 2+ weeks | Soil crust sealed surface; soil too dry; temperature below 10°C (50°F) | Mist daily to break crust; move to warmer spot; resow shallower |
| Pale yellow tops, floppy growth | Not enough light | Move to a brighter location; 6+ hours daily |
| Brown, crispy tip on each leaf | Underwatering or low humidity | Water more frequently; avoid letting soil dry deep |
| Mushy white base, rotting smell | Overwatering or poor drainage | Reduce watering; check drainage holes; replant in fresh mix |
| Tops very thin, weak after kitchen-scrap regrowth | Bulb energy exhausted | Compost that plant; start fresh with new seeds or scraps |
| Flower stalk shooting up | Bolting from heat or stress | Cut flower off, harvest all greens now; replant for next batch |
| Tiny black flies around pot | Fungus gnats from staying too wet | Let soil dry more between waterings; add a 1 cm (½ in) dry sand top layer |
| Growth stopped in summer heat | Temperature above 27°C (80°F) | Move to partial shade; resume in early autumn when temperatures drop |
Watch: How to grow green onions
A visual walkthrough of the seed and kitchen-scrap methods pairs well with the steps above. After reading this guide, search YouTube for “how to grow green onions from scraps” or “scallion planting guide” for a side-by-side visual of the water-to-soil transplant technique.
Related reading
- How to plant onion bulbs (sets) for full-size storage onions — if you want bulbing onions, that post covers long-day vs short-day varieties, 2.5 cm (1 in) depth, 10–15 cm (4–6 in) spacing, and the 90–120-day harvest timeline.
- How to plant onions that have already sprouted — a store-bought onion sprouting in your pantry is just another source of free green onion tops; this guide shows how to get them out of the compost bin and into a pot.
- How to plant asparagus crowns — another early-season edible for the same bed; asparagus and green onions are good garden neighbours.
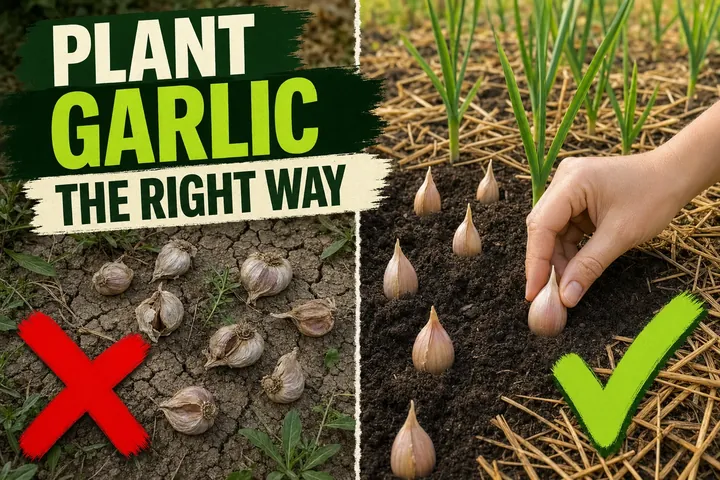
- How to plant garlic cloves — garlic is a close relative; many gardeners rotate garlic and scallion beds each season.
- Track harvest intervals and set succession-planting reminders with the free Tazart plant care app.
A note on conditions
Every garden and home grows differently. Soil mix, pot depth, light intensity, local temperature, and humidity all affect how fast your green onions grow and how often they need water. The depths, spacings, and timelines above are well-tested starting points — adjust them based on what your plants actually do in the first two weeks, and you’ll dial in a continuous supply quickly.
Highly recommended
The supplies that make this guide work
Tazart is an Amazon Associate — we earn from qualifying purchases at no extra cost to you. Thank you for helping us keep these guides free.
Frequently asked questions
When are green onions ready to harvest?
Harvest green onions when the tops reach 20–30 cm (8–12 in) tall and the white base is at least 1 cm (½ in) wide. From seed this takes 60–80 days; from sets 30–40 days; from kitchen scraps (regrowing in water, then potted in soil) you can make a first cut in 7–14 days. Snip leaves about 2.5 cm (1 in) above the soil and the plant regrows 2–3 more times.
Can you regrow green onions indefinitely?
Not indefinitely, but you can get 2–4 harvests from one planting before vigor declines. Water-grown kitchen scraps are the weakest — they exhaust the bulb's stored energy within a few cuts. Transplanting them into soil after the first water-regrow extends their productive life significantly. Starting fresh from seed or sets every 3–4 weeks (succession planting) is the most reliable path to a continuous supply.
Do green onions come back every year?
Allium fistulosum (bunching/Welsh onion) is a true perennial and can overwinter in zones 6 and warmer, returning each spring. Standard scallion varieties (Allium cepa) are treated as annuals or biennials. If you live in a cold climate, treat them as a fast-growing annual and replant each spring. In mild zones, leave a clump in the ground and divide it in early spring to propagate new plants for free.
How deep do you plant green onion seeds?
Sow green onion seeds 0.5 cm (¼ in) deep — just barely covered with a thin layer of fine soil or seed-starting mix. Deeper than 1 cm (½ in) and germination is erratic. Keep the seedbed evenly moist at 15–21°C (60–70°F) and expect germination in 7–14 days.
How far apart do you plant green onions?
Space green onions 2.5 cm (1 in) apart within the row, with rows 15 cm (6 in) apart. No thinning is needed — dense spacing is normal for scallions. In containers, a 15–20 cm (6–8 in) deep pot can hold 10–15 plants in a tight ring.
Can you regrow green onions from kitchen scraps?
Yes. Save the white root ends (at least 2.5 cm / 1 in of white base) from store-bought green onions. Place them root-end-down in a glass with 2.5 cm (1 in) of water. Change the water every 1–2 days. After 7–10 days the tops regrow enough to snip. For a sustained harvest, transplant into soil after the first cut — water-grown scraps lose vigor quickly without nutrients.