Flowers
How to Plant Crocus Bulbs (First Color of Spring)
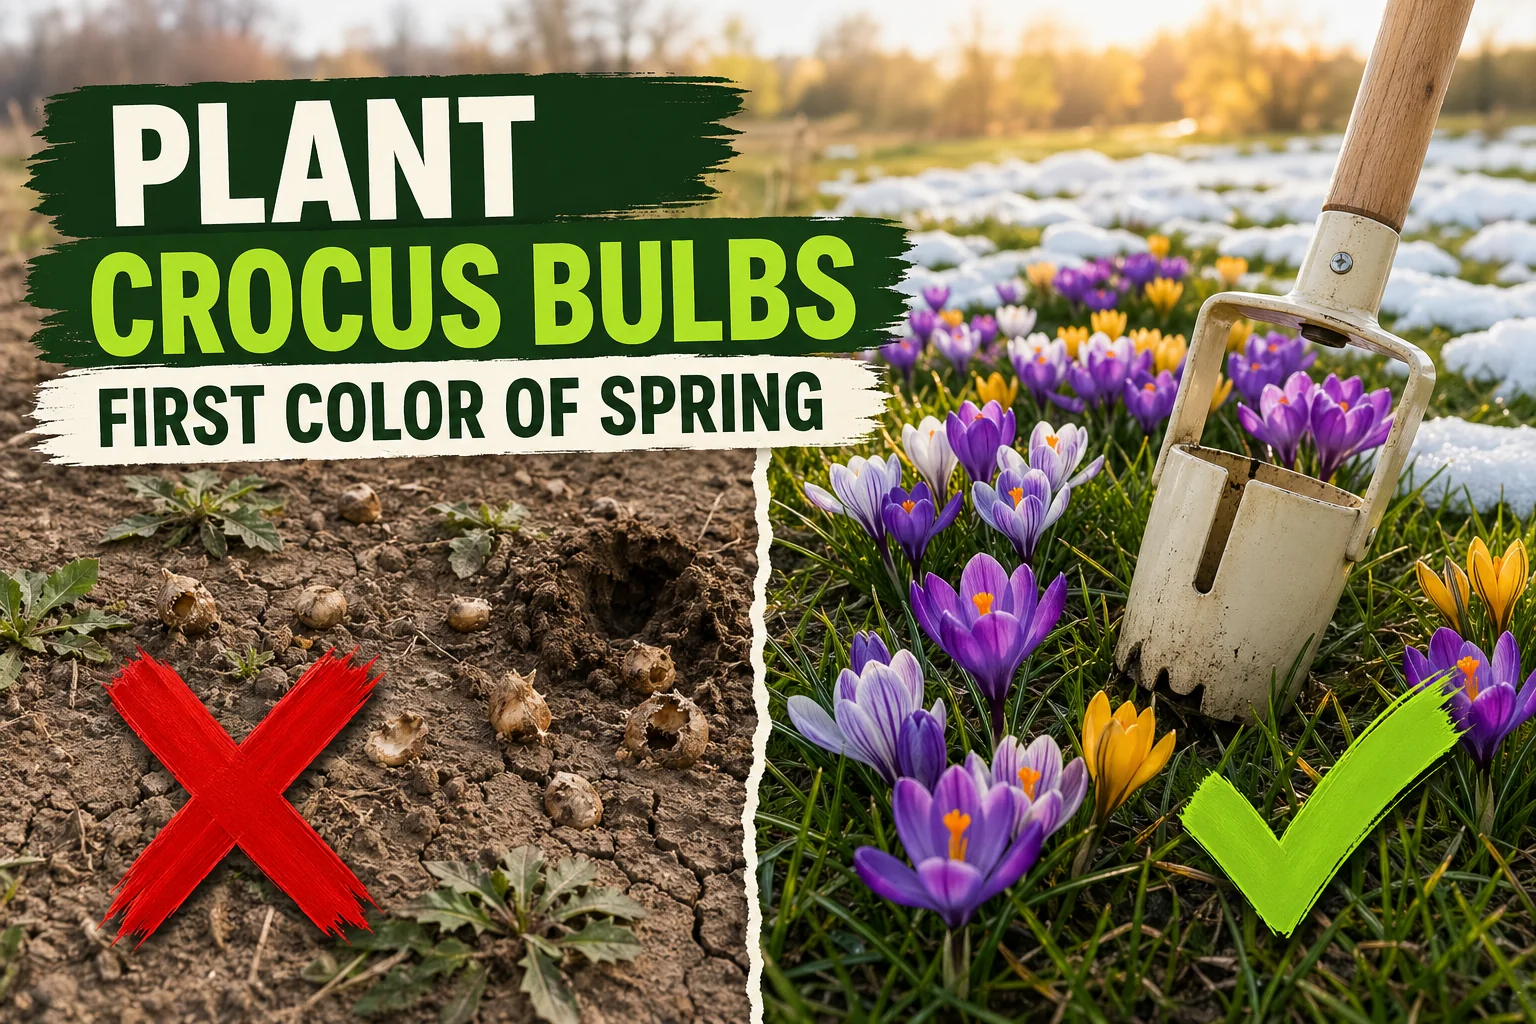
Plant crocus corms 8 cm (3 in) deep, 7 cm (3 in) apart, pointed end up, in fall — the exact depth, spacing, and timing for a bright early-spring drift.
On this page
- Quick answer
- Why fall planting works
- What you’ll need
- Step-by-step: planting crocus corms
- Naturalizing crocus in lawn vs beds
- Crocus in containers
- Protecting corms from squirrels
- Care after planting and the leaf-fade rule
- Common mistakes to avoid
- Troubleshooting
- Watch: planting crocus corms
- Related reading
- A note on conditions
Watch the visual walkthrough
How to Grow a Crocus Lawn - Autumn Bulb Growing Tips for Winter Flowers
A short visual walkthrough that pairs with the steps above.
If you’ve ever planted crocus corms and ended up with thin floppy leaves — or no flowers at all — the cause is almost always one of three things: shallow planting, soggy soil, or planting too late. Crocus are forgiving about variety and colour, but they are strict about depth, drainage, and timing.
This guide walks through it the way a crocus corm actually wants — pointed-side up, 8 cm (3 in) deep, 7 cm (3 in) apart, in well-drained soil, planted in fall. Get those four things right and you’ll wake up to a vivid purple, yellow, and white drift as the first colour of spring.
Quick answer
Plant crocus corms in fall, six to eight weeks before the ground freezes, in a sunny spot with well-drained soil. Set each corm pointed-side up at a depth of 8 cm (3 in) and space them 7 cm (3 in) apart. Mulch with 3–5 cm (1–2 in) of bark, water once at planting, and leave them alone until the first green shoots push through in late winter or very early spring.
Why fall planting works
A crocus corm is a tiny pre-packed plant — leaves, flower bud, and food are already inside. Your job is to give it cold, dark, well-drained conditions for 12–15 weeks so it can set roots and trigger bloom hormones. That cold period is called vernalization, and without it the corm simply skips flowering.
Two things ruin vernalization:
- Shallow planting (less than 5 cm / 2 in): the corm freezes and thaws repeatedly, gets eaten by squirrels, or pushes out of the ground in heavy frost.
- Wet soil: Crocus species evolved on dry rocky slopes around the Mediterranean and western Asia. They rot fast in soggy clay or low-lying beds.
Get the depth and drainage right and crocus usually look after themselves for years — many varieties naturalize and multiply.
What you’ll need
- Firm crocus corms with intact papery skins (skip soft, mouldy, or hollow ones)
- A sunny to lightly shaded spot — at least 4–6 hours of direct sun
- Well-drained soil; if you have heavy clay, mix in 5 cm (2 in) of coarse sand or grit
- A bulb planter, a regular trowel, or a dibber for big plantings
- Organic bone meal (a small pinch per hole)
- 3–5 cm (1–2 in) of organic mulch (shredded bark or leaf mould)
- A watering can
Step-by-step: planting crocus corms
1. Choose the right corms
Pick corms that feel firm and heavy for their size, with intact papery skins. The bigger the corm, the bigger the flower — for show beds, look for corms at least 2.5 cm (1 in) wide.
Reject any corm that is:
- Soft or squishy when squeezed
- Showing fuzzy white or blue mould
- Hollow or rotted at the basal plate
- Already sprouting more than 1 cm (½ in) of green growth
2. Pick the right spot and timing
Crocus need full sun to light shade, well-drained soil, and a fall planting window. Aim for soil temperatures around 10–13°C (50–55°F) — usually:
- Cool / cold zones (USDA 3-6): September to early November
- Mild zones (USDA 7-8): late October to early December
- Warm zones (USDA 9-10): late November to mid-December (with pre-chilled corms)
If a hard frost has already arrived, you can still plant — the corms will just root a little later.
3. Prepare the soil
Loosen the soil to a depth of 15–20 cm (6–8 in) and remove rocks and roots. If your soil is heavy clay, mix in coarse sand, grit, or compost so water moves through. If it’s pure sand, mix in compost so the soil holds enough moisture for root growth.
Work a small pinch of organic bone meal into the bottom of each hole. Phosphorus is what corms actually use — it fuels root and flower development through fall.
4. Dig to the right depth
The standard rule for crocus: plant the corm 8 cm (3 in) deep, measured from the top of the corm to the soil surface. Use the deeper end (10 cm / 4 in) in sandy soil or very cold zones, and the shallower end (6 cm / 2½ in) in heavy clay or mild winters.
A long-handled bulb planter cuts a clean cylinder fast — useful when you’re planting 100 or 200 corms for a naturalized drift. A regular trowel or dibber works for smaller plantings.
5. Set the corm pointed-side up
Place the corm in the hole with the pointed tip facing up and the flat basal plate (where roots emerge) facing down. If you can’t tell which way is up, plant it on its side — the shoot will correct itself toward the light.
Space corms 7 cm (3 in) apart for a natural drift, or 5 cm (2 in) apart in a tight container display. Don’t let corms touch — touching corms invite rot.
6. Backfill, water once, and mulch
Cover the corms with the soil you removed, firm gently, and water once to settle the soil and start root growth. Don’t water again unless the autumn is unusually dry for more than three weeks.
Top with 3–5 cm (1–2 in) of organic mulch — shredded bark or leaf mould both work. Mulch insulates the corms against frost heave, locks in moisture, and helps hide their scent from squirrels.
7. Mark the spot
Crocus are small, and it’s easy to forget where you planted them — especially if you naturalize them in a lawn. Push a short bamboo stake or a labelled plant marker at each end of the planting band so you don’t accidentally dig through them in spring.
8. Walk away until late winter
This is the easiest step. Crocus don’t need fertilizer, pruning, or watering through winter. The first green shoots usually push through in late winter or very early spring, with flowers 2–4 weeks later — often while patches of snow are still around.
Naturalizing crocus in lawn vs beds
Crocus are one of the easiest bulbs to naturalize, meaning they spread on their own and come back stronger every year. Two approaches:
- In a lawn: scatter the corms by hand over the area, then plant each one where it lands at 8 cm (3 in) deep. Random spacing reads as wild. Don’t mow the lawn until the crocus leaves have yellowed (usually 4–6 weeks after bloom) — those leaves are recharging the corm for next year.
- In beds and borders: plant in clusters of 15–25 corms rather than thin lines. A drift of one colour beside a drift of another reads bigger than scattered single corms.
Many crocus species — Crocus tommasinianus, Crocus chrysanthus, Crocus vernus — multiply by offsets and seed, so a small fall planting can become a large drift in three to five years.
Crocus in containers
Crocus do beautifully in pots if you treat the pot like a slightly colder version of the ground:
- Use a pot at least 15 cm (6 in) deep with drainage holes
- Fill the bottom 2–3 cm (1 in) with gravel for drainage
- Plant the corms 5–7 cm (2–3 in) deep, almost shoulder-to-shoulder
- Move the pot to an unheated garage or shed for the 12–15 week chill if winters are mild
- Bring it back outside in late winter once green shoots appear
Containerized crocus are usually one or two-season displays — refresh the corms every couple of years for the best show.
Protecting corms from squirrels
Squirrels, chipmunks, voles, and mice love crocus corms. Three things help:
- Plant deep. A corm at 8–10 cm (3–4 in) is harder to find than one at 3 cm (1 in).
- Cover the bed with mulch or chicken wire. Mulch hides the scent. A panel of chicken wire pinned over the bed in fall stops digging — pull it off in spring before shoots emerge.
- Mix in daffodils or alliums. Both are toxic to rodents, and animals quickly learn to avoid the whole patch.
Care after planting and the leaf-fade rule
Once crocus are in the ground, they’re nearly self-sufficient. The four things that matter:
| Task | When |
|---|---|
| Water | Only if winter is unusually dry; resume light watering when shoots emerge |
| Fertilize | A light scatter of bone meal in early spring as buds form |
| Deadhead | Optional — snap off spent flowers if you don’t want self-seeding |
| Let foliage yellow | Don’t cut leaves until they yellow naturally — that’s the corm refilling for next year |
The leaf-fade rule is the single most important thing for repeat blooms. Cutting or mowing green crocus leaves in spring — before they yellow — starves the corm and you’ll get fewer or no flowers next year. Wait until the leaves are fully yellow, usually 4–6 weeks after bloom, before mowing or tidying.
A free plant care app like Tazart tracks corm planting dates, the cold-chill window, and your local frost timing, then pings you when it’s time to plant or apply mulch — useful if you’re naturalizing more than one bed.
Common mistakes to avoid
- Planting upside-down. A corm that has to flip itself uses energy it needs for blooms. Pointed end up, flat plate down — or on its side if you can’t tell.
- Planting too shallow. Less than 5 cm (2 in) and corms get eaten, frost-heaved, or grow weak short stems.
- Wet, low-lying soil. Crocus rot in soggy ground. Plant on a slight slope or amend clay with sand and compost.
- Skipping the cold period. Without 12–15 weeks at 4–9°C (40–48°F) the corm won’t trigger a flower. In warm zones, pre-chill in the fridge.
- Mowing the lawn too early. Green leaves are recharging the corm. Mow before they yellow and you’ll get fewer (or no) blooms next year.
- Buying soft or mouldy corms. Bargain bins late in the season often hide corms past their planting window. Squeeze before you buy.
Troubleshooting
| Symptom | Likely cause | Fix |
|---|---|---|
| All leaves, no flowers | Planted too shallow, too little chilling, or corm too small | Plant at 8 cm (3 in); pre-chill in warm zones; replace small corms with bigger ones |
| Corms rotted before spring | Waterlogged soil or upside-down planting | Improve drainage with sand/grit; orient pointed-side up; lift the bed if it sits in a low spot |
| Stems are short and weak | Not enough sun, or planted too shallow | Move to a 4–6 hour sun spot; replant at 8 cm (3 in) next fall |
| Corms disappeared before spring | Squirrels, chipmunks, or voles | Plant 8–10 cm (3–4 in) deep; cover with chicken wire over winter; mix with daffodils |
| Flowers smaller every year | Overcrowding from offsets; tired soil | Lift and divide every 4–5 years; top-dress with bone meal in early spring |
| Leaves yellow before flowers open | Late frost or fungal disease | Mulch in early spring to buffer temperature swings; remove and bin affected corms |
Watch: planting crocus corms
A short visual walkthrough pairs well with the steps above. If you’re a visual learner, watch a quick tutorial like How to Plant Crocus Bulbs on YouTube and then come back to follow the timing in this guide.
Related reading
- How to plant tulip bulbs the right way — another fall-planted bulb where depth makes the difference between a vivid drift and rot.
- How to plant daffodil bulbs — pair daffodils with crocus for a rodent-proof, layered early-spring display.
- How to plant peony bulbs the right way — extend the season from your crocus drift into late spring with a perennial that loves the same fall planting window.
Track planting dates, cold-chill windows, and bloom timing across all your bulbs in one place with the free Tazart plant care app — it’ll ping you when it’s time to plant, mulch, or stop mowing the lawn.
A note on conditions
Every garden is different. USDA zone, soil type, fall rainfall, mulch depth, and rodent pressure all affect how crocus perform. Use the depth, spacing, and timing above as a starting point and adjust based on how your corms come up in their first spring — that’s how every good bulb gardener learns.
Highly recommended
The supplies that make this guide work


Tazart is an Amazon Associate — we earn from qualifying purchases at no extra cost to you. Thank you for helping us keep these guides free.
Frequently asked questions
How deep do you plant crocus bulbs?
Plant crocus corms about 8 cm (3 in) deep, measured from the top of the corm to the soil surface. That's roughly three times the height of a typical 2.5 cm (1 in) corm. Shallow planting (less than 5 cm / 2 in) leaves corms exposed to frost heave, squirrels, and weak short stems. Go to the deeper end (10 cm / 4 in) in sandy soil or cold zones; stay closer to 8 cm (3 in) in heavy clay.
When should you plant crocus bulbs?
Plant in fall, six to eight weeks before the ground freezes — typically September to early November in cool climates and late October to early December in mild zones. Crocus corms need 12–15 weeks of cold soil at 4–9°C (40–48°F) to set flowers. Aim for soil temperatures around 10–13°C (50–55°F) when you plant. Miss the fall window and you can refrigerate the corms for 12–15 weeks and plant in late winter as a backup.
Which way is up on a crocus corm?
The pointed tip goes up, and the flat or slightly concave basal plate (where the roots emerge) goes down. If a corm is so round you can't tell, plant it on its side — the shoot will turn itself toward the light. Upside-down corms waste energy correcting course and often produce shorter, weaker stems.
Do crocus bulbs need full sun?
Crocus prefer full sun to light shade — at least 4–6 hours of direct sun per day. They bloom and bank energy before deciduous trees leaf out, so spots under maples and oaks usually work well. Deep evergreen shade gives you weak stems and thin colour, and the corms may skip blooming altogether.
Can you plant crocus bulbs in spring?
Only if the corms have already received their cold treatment — 12–15 weeks at 4–9°C (40–48°F) in a refrigerator (away from ripening fruit). Without that chill, an unrefrigerated corm planted in spring will produce thin leaves but rarely a flower. For most gardeners it's easier to plant fresh corms next fall.
How far apart should crocus bulbs be planted?
Space crocus corms about 7 cm (3 in) apart for a natural drift, or as close as 5 cm (2 in) apart for a dense container display. For naturalizing in a lawn, scatter the corms by hand and plant them where they fall — the random spacing reads as wild and uniform plantings tend to look fake at this small scale.