Guide
How to Plant Asparagus Crowns (The Right Way)
Plant asparagus crowns in a 15–20 cm (6–8 in) trench, fan roots outward, and backfill gradually. Follow this step-by-step guide for a 20+ year perennial bed.
On this page
- Quick answer
- Table of contents
- Why trench depth matters
- Soil preparation
- Soaking asparagus crowns
- Step-by-step planting guide
- Spacing: crowns and rows
- Gradual backfilling explained
- Harvest timeline: years 1–4+
- Common mistakes
- Troubleshooting table
- Watch: How to Plant Asparagus Crowns
- FAQ
- Related reading
- A note on conditions
Watch the visual walkthrough
How to Grow Asparagus, Complete Growing Guide
Plant asparagus once and it will feed you for the next 20 years! Intro- 0:00 5 Year old patch of Asparagus- 0:16 Planting ...
Asparagus is one of the most rewarding vegetables you can grow — but only if you plant it correctly the first time. The crowns you put in the ground this spring will still be feeding you in 2045. Get the depth wrong, skip the root-fanning step, or rush the backfilling, and you will spend three years waiting for a bed that underperforms.
This guide covers every step: trench depth, soaking, the fan-out technique, gradual backfilling, and the harvest timeline that makes the difference between a 5-year bed and a 30-year one.
Quick answer
Dig a trench 15–20 cm (6–8 in) deep. Soak bare-root crowns for 15–30 minutes, then set each crown on a small soil mound and fan the roots outward in a radial pattern. Cover with 5 cm (2 in) of soil, then backfill gradually as spears emerge. Space crowns 30–45 cm (12–18 in) apart in rows 1.2–1.5 m (4–5 ft) apart. Do not harvest until year 3.
Table of contents
- Why trench depth matters
- Soil preparation
- Soaking asparagus crowns
- Step-by-step planting guide
- Spacing: crowns and rows
- Gradual backfilling explained
- Harvest timeline: years 1–4+
- Common mistakes
- Troubleshooting table
- FAQ
Why trench depth matters
Asparagus (Asparagus officinalis) is a perennial. Unlike annual vegetables that are replanted every year, your asparagus crowns will be in the ground for 20–30 years. The trench you dig today determines how well the root system anchors, how deeply it accesses moisture during dry summers, and how resistant it is to frost heave in cold winters.
Too shallow (under 10 cm / 4 in): The crown sits too close to the surface. Frost heave pushes it upward over winter. Surface roots dry out in summer. Yields are thin and the bed deteriorates within a decade.
Too deep (over 25 cm / 10 in): Spears take longer to push through the soil in spring, weakening the plant before harvest even begins. In heavy clay, waterlogging around a deeply set crown causes rot.
The sweet spot — 15–20 cm (6–8 in): This depth puts the crown below the freeze zone in most temperate climates, gives roots room to extend downward, and still lets spears emerge quickly in spring.
Soil preparation
Asparagus is a long-term investment. Spend extra time on soil prep — you will not get another chance once the bed is established.
Choose the right site. Asparagus needs full sun (at least 6–8 hours per day), excellent drainage, and protection from strong winds that snap the tall summer ferns. Pick a permanent spot at the edge of your vegetable garden where it will not shade other crops.
Test and adjust pH. Asparagus performs best at pH 6.5–7.5. Apply lime to raise pH or sulphur to lower it at least a few weeks before planting.
Clear perennial weeds completely. Bindweed, couch grass, and dock growing through an established asparagus bed are almost impossible to remove without digging out the whole planting. Hoe and hand-pull thoroughly in autumn before your spring planting date.
Amend the trench bottom. Fork the trench base loose an additional 10 cm (4 in) and work in a 5 cm (2 in) layer of well-rotted compost plus a generous handful of bone meal or superphosphate per metre (3 ft) of trench. Phosphorus drives root development — the crown needs maximum root mass in years 1–2.
Soaking asparagus crowns
Always soak crowns before planting. Even fresh-dug crowns benefit from a short soak; mail-order crowns that have been packaged for days or weeks need it.
Fill a bucket with lukewarm water — not cold, not hot. Submerge the crowns and leave them for 15–30 minutes. Do not soak for longer than an hour; prolonged soaking can cause the roots to become waterlogged and sluggish.
What the soak does:
- Rehydrates the fleshy storage roots, which shrink slightly during storage
- Makes roots pliable so you can fan them out without snapping them
- Gives the crown an initial water reserve before soil contact
Step-by-step planting guide
1. Dig the trench
Dig a flat-bottomed trench 15–20 cm (6–8 in) deep and about 30 cm (12 in) wide. Fork the trench floor loose and incorporate compost and bone meal as described above.
If your soil is heavy clay, dig slightly shallower — 15 cm (6 in) — and raise the surrounding bed height with compost to improve drainage.
2. Soak the crowns
While digging, soak crowns in lukewarm water for 15–30 minutes (see above).
3. Build a small soil mound in the trench base
For each crown position, mound a small ridge of improved soil in the centre of the trench base. The mound should be about 5–8 cm (2–3 in) high. This mound is what holds the crown bud at the correct height while the roots hang down each side — a technique that prevents the roots from bunching under the crown.
4. Set the crown on its mound
Take one crown from the water. Hold it by the central bud cluster — the knobbly, slightly lighter-coloured growing point — and set it on top of its mound with the bud facing upward. The top of the bud should sit approximately 5 cm (2 in) below the final soil surface once the trench is fully backfilled.
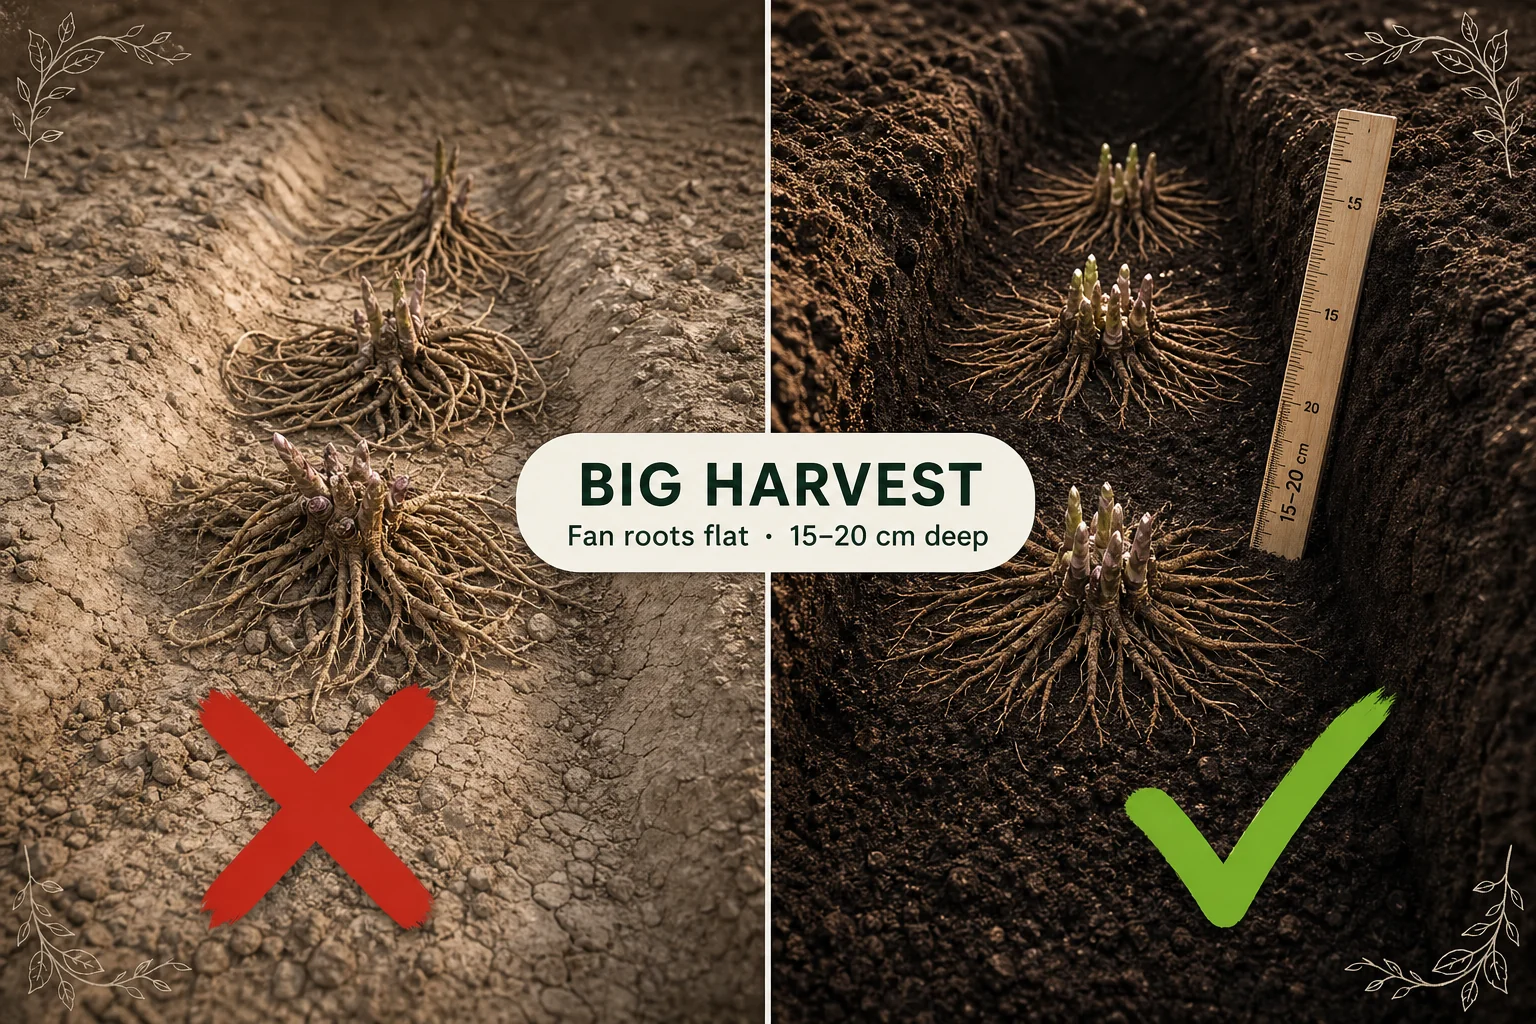
5. Fan the roots outward
This is the most important technique in asparagus planting, and the one most gardeners skip.
Gently spread each individual root away from the central bud in all directions — imagine the hands of a clock, or the spokes of a wheel. Every root should lie flat and horizontal against the trench floor. No root should:
- Fold under the crown
- Cross another root
- Double back toward the crown
Why does this matter? A root that doubles back or folds is kinked underground. A kinked root cannot transport water and nutrients efficiently. Over years, those roots lag behind their well-placed counterparts. In a 30-year bed, the difference between fanned and unfanned roots is visible in spear thickness and yield by year 5.
Take 30 seconds per crown to get this right.
6. Cover with the first 5 cm (2 in) of soil
Using the amended soil you dug out of the trench, add the first layer: approximately 5 cm (2 in) of soil over the crowns. Water gently to settle the soil around the roots. Do not add more soil yet — leave the trench partially open for gradual backfilling.
Spacing: crowns and rows
| Measurement | Recommendation |
|---|---|
| Crown to crown (in-row) | 30–45 cm (12–18 in) |
| Row to row | 1.2–1.5 m (4–5 ft) |
| Trench depth | 15–20 cm (6–8 in) |
| Crown to final surface | ~5 cm (2 in) when backfilled |
| First backfill layer | 5 cm (2 in) |
Why 30–45 cm between crowns? Each plant sends up feathery fern 1–1.5 m (3–5 ft) tall in summer. That fern powers next year’s spears through photosynthesis — crowded ferns shade each other and reduce yield.
Why 1.2–1.5 m between rows? Rows closer than 90 cm (3 ft) form a light-blocking fern wall by year 5. Wider rows also make weeding, mulching, and top-dressing far easier.
Gradual backfilling explained
One of the most common asparagus planting mistakes is filling the trench completely on planting day and then waiting for spears to appear. Do not do this.
The gradual backfilling method:
- At planting: Add 5 cm (2 in) of soil. Water in.
- When spears push through that layer: Add another 5 cm (2 in). Water in.
- Repeat until the trench is level with the surrounding soil — typically by midsummer.
Why this works:
- The spear that pushes through each layer of soil develops more lateral root mass than a spear that never encounters resistance.
- The crown is never smothered — it always has air and warmth near its growing tip.
- The gradual process mimics how asparagus naturally colonises and deepens its root zone in the wild.
By midsummer, the trench should be filled to bed level. After the first hard autumn frost kills the ferns, cut them to 5 cm (2 in) above ground and top-dress with 5–8 cm (2–3 in) of compost.
Harvest timeline: years 1–4+
Patience here directly determines how long your bed lasts.
| Year | What to do |
|---|---|
| Year 1 | Let ALL spears fern out. Harvest nothing. |
| Year 2 | Let ALL spears fern out. Harvest nothing. |
| Year 3 | Harvest lightly for 2–3 weeks; cut at 15–20 cm (6–8 in). Stop and let the rest fern. |
| Year 4+ | Full 6–8 week harvest season each spring. |
Each spear cut in years 1–2 is a spear that did not become fern, and fern that did not photosynthesize means a weaker crown the following year. Skip cutting for two full seasons and you build a crown capable of feeding you for 20–30 years.
Year 3: Harvest when spears are 1–1.5 cm (about ½ in) in diameter and 15–20 cm (6–8 in) tall. After 2–3 weeks, stop and let the remaining spears fern out. The bed needs the second half of the season to recharge.
Year 4+: Full 6–8 week harvest. Stop when spear diameter drops below 1 cm (⅓ in) — the crown is signalling that it needs to recharge. Feed with balanced fertiliser in late spring; top-dress with compost in autumn.
Common mistakes
Planting too shallow. Any crown set shallower than 10 cm (4 in) is vulnerable to frost heave. The minimum trench depth is 15 cm (6 in).
Skipping the soak. Dry roots snap instead of fanning flat. Always soak for 15–30 minutes.
Filling the trench all at once. Smothering the crown on planting day starves the emerging spear of warmth. Backfill in 5 cm (2 in) stages.
Harvesting in years 1 or 2. Premature cutting weakens the crown so severely it may never reach full production. Wait.
Waterlogged soil. Asparagus crowns rot in standing water. Raise the bed or work in grit and compost before planting if drainage is poor.
Ignoring perennial weeds. Clear bindweed and couch grass completely before planting — they are nearly impossible to remove once the bed is established.
Leaving female-plant berries on the ground. If you have mixed-sex varieties, collect red autumn berries before they drop and self-seed across the bed.
Troubleshooting table
| Symptom | Likely cause | Fix |
|---|---|---|
| No spears after 6 weeks | Crown planted too deep, or waterlogged soil | Check drainage; if soil is soggy, improve drainage and wait — do not dig up |
| Very thin spears in year 3 | Crown still building reserves — harvested too early in prior years | Stop harvesting immediately; let all ferns grow this season |
| Spears emerge then collapse | Frost damage to emerging tips | Cover bed with fleece / row cover during late frosts in spring |
| Ferns turn yellow in summer | Nitrogen deficiency or drought stress | Top-dress with balanced fertiliser; mulch to retain moisture |
| Crowns heaving above soil surface | Planted too shallow; frost heave | Re-cover with compost in autumn; improve mulch depth in cold zones |
| Red berries on plants in autumn | Female plants producing seed | Remove berries before they drop; consider replanting with all-male hybrids |
| Rust-coloured streaks on ferns | Asparagus rust (fungal disease) | Improve airflow between rows; remove and burn affected ferns |
Watch: How to Plant Asparagus Crowns
This video gives a clear visual walkthrough of the trench, crown placement, and root-fanning technique — a helpful companion to the step-by-step instructions above.
A verified YouTube video will be embedded here after running the resolver.
FAQ
Answers to the most common asparagus planting questions.
Related reading
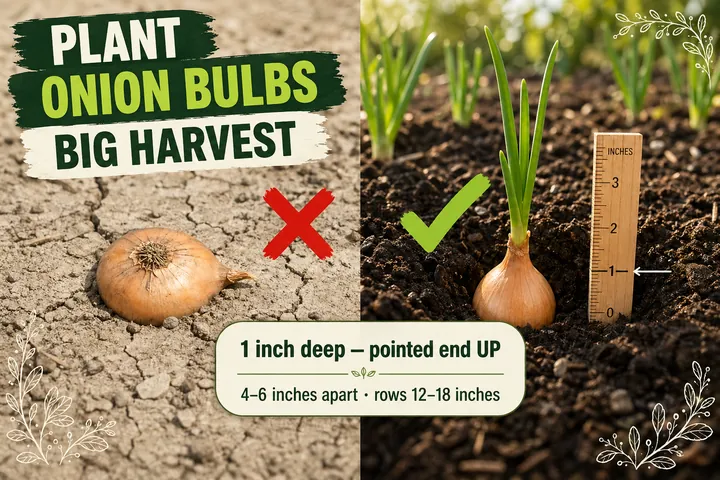
- How to plant onion bulbs — similar trench-and-space logic for another long-season allium crop that rewards patient planting.
- How deep to plant garlic — depth and zone adjustments for garlic, the perennial bed companion most asparagus growers add alongside.
- How to start a vegetable garden — if you are building a new plot for your asparagus bed, start here for site selection, soil prep, and layout planning.
- Track your asparagus bed’s watering, fertilising, and annual harvest timing with the free Tazart plant care app — set recurring reminders for the top-dressing and fern cut-back routine that keeps a perennial bed productive for decades.
A note on conditions
Every garden is different. Soil texture, climate zone, drainage, and asparagus variety all affect how quickly the bed establishes and how long it stays productive. Use the depths, spacings, and timelines above as a strong evidence-based starting point. After your first full season, note which crowns look strongest — they are your reference points if you expand the bed.
Highly recommended
The supplies that make this guide work


Tazart is an Amazon Associate — we earn from qualifying purchases at no extra cost to you. Thank you for helping us keep these guides free.
Frequently asked questions
How deep should asparagus crowns be planted?
Plant asparagus crowns in a trench 15–20 cm (6–8 in) deep. Set the crown on a small mound of soil at the bottom so the bud tip sits about 5 cm (2 in) below the final soil surface once backfilling is complete. In sandy or very free-draining soil, go slightly deeper at 20 cm (8 in); in heavy clay, keep to 15 cm (6 in) to prevent waterlogging.
How far apart do you plant asparagus crowns?
Space crowns 30–45 cm (12–18 in) apart within the row, with rows 1.2–1.5 m (4–5 ft) apart. This generous spacing allows the fern canopy to develop fully each summer without competition, which is what fuels next year's spear production. Crowded asparagus never reaches full yield potential.
Should you soak asparagus crowns before planting?
Yes. Soak bare-root asparagus crowns in lukewarm water for 15–30 minutes before planting. Crowns are often slightly dehydrated after storage or shipping. The soak rehydrates the roots, making them more pliable and easier to fan out flat in the trench — and it gives the plant an immediate moisture reserve to draw on as it settles in.
When can you first harvest asparagus?
Do not harvest asparagus in years 1 or 2. Let all spears grow into fern to build crown energy. In year 3, harvest lightly — for 2–3 weeks only — cutting spears when they reach 15–20 cm (6–8 in) tall. From year 4 onward, harvest for a full 6–8 week season. Patience in the early years directly determines how long and how productive the bed remains.
How do you fan out asparagus roots when planting?
After soaking the crown, set it on a small central soil mound at the base of the trench. Spread each individual root outward from the central bud crown in a radial pattern — like the spokes of a wheel — so they lie flat and horizontal against the trench floor. Avoid letting any roots double back or fold under themselves. This flat, fanned-out position gives every root equal access to soil moisture and nutrients.
How do you backfill an asparagus trench?
Backfill gradually over the growing season — not all at once on planting day. After setting the crowns, add 5 cm (2 in) of soil to cover them. As the spears grow through that layer, add another 5 cm (2 in). Continue until the trench is level with the surrounding bed by midsummer. Gradual backfilling encourages deeper rooting and prevents the crown from being smothered before growth begins.
How long does asparagus take to produce a full harvest?
Asparagus takes 3 years from crown planting to a light first harvest, and 4 years to a full harvest season. That timeline is non-negotiable — the crown must store several seasons of energy before it can sustain multi-week cutting. The payoff is a bed that produces reliably for 20–30 years with minimal replanting.
Can you plant asparagus crowns in spring?
Yes — spring is the ideal time. Plant asparagus crowns as soon as the soil is workable and has reached at least 10°C (50°F), typically March to early May in temperate zones. Avoid planting in frozen or waterlogged soil. Fall planting is possible in mild climates (zones 7–10) but spring planting gives crowns a full growing season to establish before their first winter.