Edible
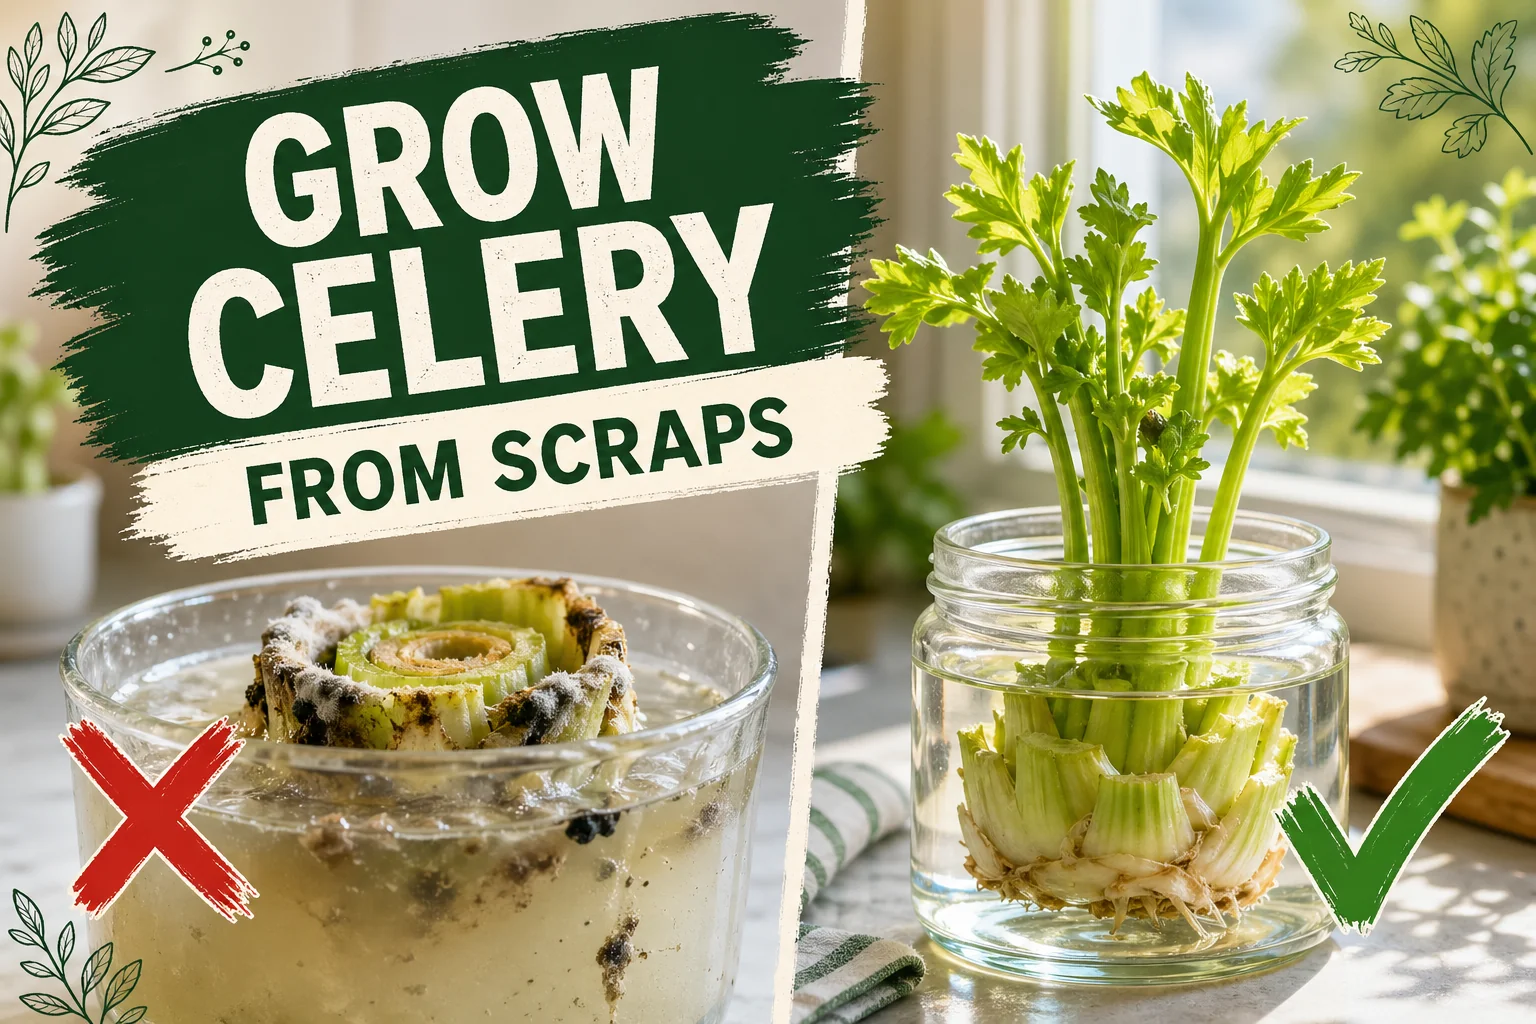
How to Grow Celery from Scraps (Regrow from the Base)
Cut the celery base, set it in 2.5 cm of water, and regrow fresh shoots in 5 days. Step-by-step guide covering water, light, transplanting, and honest results.
On this page
- Quick answer
- Table of contents
- What you will get (and what you won’t)
- What you need
- Step-by-step: regrowing celery in water
- Step-by-step: transplanting to soil
- Light, temperature, and conditions
- Common mistakes
- Troubleshooting
- Other scraps that work the same way
- Watch: regrowing celery from scraps
- Related reading
- A note on conditions
Watch the visual walkthrough
The TRUTH About Regrowing Veggies From Kitchen Scraps
Get free seeds, shipping, and returns: https://www.epicgardening.com/greenhouse/ We've all seen them - and I've even ...
Yes — that celery base you’re about to compost will regrow. Place it cut-side up in a shallow dish with 2-3 cm (1 in) of water, set it on a bright windowsill, and green shoots will push up in 4 to 7 days.
This guide covers the complete process from first cut to soil transplant, sets honest expectations about what the regrowth can and cannot produce, and compares the other scraps that work by the same method.
Quick answer
Cut the celery base 3-5 cm (1-2 in) above the root end. Rinse it, place it cut-side up in a shallow dish with 2-3 cm (1 in) of water. Change the water every 2 days. You will see sprouts in 4 to 7 days. After 7 to 10 days, once roots reach 2-4 cm (1 in) long, transplant to a deep pot of moist potting mix for continued growth. Regrown shoots are good for cooking; full-sized stalks take 4 to 6 months in soil.
Table of contents
- What you will get (and what you won’t)
- What you need
- Step-by-step: water phase
- Step-by-step: transplanting to soil
- Light, temperature, and conditions
- Common mistakes
- Troubleshooting
- Other scraps that work the same way
- Watch: regrowing celery from scraps
- FAQs
What you will get (and what you won’t)
Before you start, set realistic expectations — most guides oversell this.
What regrowth gives you:
- Thin inner shoots, celery-scented leaves, and narrow pale stems — excellent chopped into soups, stocks, stir-fries, and sauces
- A continuous supply of fresh celery flavour from a scrap you would have thrown away
- A living plant to look at on the windowsill that doubles as a herb
What regrowth does not give you (without months of soil growing):
- The thick, crisp, 30 cm (12 in) stalks from a grocery-store bunch — those come from 3 to 4 months of commercial growing in deeply watered field soil
- Unlimited regrowth from a single base — stored energy in the base runs out, and the plant depends on roots in soil to keep going
- A replacement for buying celery, unless you commit to a full grow-out in soil over 4 to 6 months
That honesty out of the way, the regrowth is still genuinely useful and surprisingly fast.
What you need
- One celery bunch from any grocery store (the fresher, the better — avoid bases that are already brown and slimy)
- A sharp knife or kitchen scissors
- A shallow dish, bowl, or wide container at least 5 cm (2 in) deep
- Filtered or tap water (if your tap water is heavily chlorinated, let it sit in a glass for 1 hour before using)
- A sunny windowsill — at least 4 hours of bright light per day
- Optional for transplanting: a 15 cm (6 in) deep pot with drainage holes and general-purpose potting mix
- Optional: liquid seaweed fertilizer for after transplanting
Step-by-step: regrowing celery in water
1. Make the cut
Use your celery as normal — stalks for snacking, cooking, or whatever you need. Stop your cut 3 to 5 cm (1 to 2 in) above the base, leaving the root end intact with the tightly packed inner stems still attached.
You want the dense, pale core at the very bottom — that cluster of tightly furled inner stems is where the growth nodes are. If the outer edges of the base are browning or slimy, trim those away with a clean knife to expose fresh pale tissue.
2. Rinse the base
Hold the cut base under cool running water and give it a quick rinse, cut-side down. This removes any residue and helps prevent bacterial build-up in the dish.
3. Place in shallow water
Set the base cut-side up in your shallow dish. Add water until it just covers the very bottom of the base — about 2-3 cm (1 in) deep. The cut surface should be submerged but the inner shoots should remain above water.
Do not submerge the whole base. Celery bases kept in deep water rot quickly. Only the base of the base needs moisture.
4. Set on a bright windowsill
Place the dish on a windowsill that gets at least 4 to 6 hours of bright light per day. South- or east-facing windows work well. The cooler the room, the better — celery is a cool-season crop and grows more vigorously at 13-18°C (55-65°F) than in a hot kitchen above 24°C (75°F).
5. Change the water every 2 days
This step is non-negotiable. Stagnant water is the number-one reason celery bases go slimy and rot before they sprout. Every 48 hours:
- Tip out the old water
- Rinse the dish and the base gently under the tap
- Refill to the same 2-3 cm (1 in) line with fresh water
If the water turns cloudy or smells off before 2 days are up, change it immediately.
6. Watch for sprouts: 4 to 7 days
Within 4 to 7 days you will notice small, pale green shoots beginning to push up from the centre of the base. By day 10, those shoots will have grown noticeably and you may see fine white roots emerging from the bottom and sides of the base.
At this point you have two options:
- Harvest the shoots now — snip the inner leaves and thin stems for cooking. The base will continue to push out more shoots for 2 to 3 more cycles.
- Transplant to soil — the better choice for anyone who wants the plant to keep growing properly.
Step-by-step: transplanting to soil
Transplanting is what turns a short-lived kitchen experiment into a plant that can produce for months.
1. Wait for roots
Before moving the base to soil, let it sit in water until white roots extend 2-4 cm (1 in) from the base. This usually happens by day 7 to 10. Roots give the plant a head start in the pot and dramatically reduce transplant stress.
2. Prepare a deep pot
Celery has a long taproot and needs depth. Use a pot at least 20-25 cm (8-10 in) deep with drainage holes. Fill it with a rich, moisture-retentive potting mix — general-purpose bagged mix is fine. Celery grown for stalks needs consistently moist (not wet) soil.
3. Plant the base
Make a hollow in the centre of the soil, deep enough to bury the base to its shoulders — leaving only the green shoots above the soil surface. Set the base in, backfill, and firm gently around it.
Water thoroughly until you see water drip from the drainage holes. The soil should be dark and moist, not waterlogged.
4. Position in cool, bright light
Place the pot in your brightest window or, if outdoor temperatures are between 10-18°C (50-65°F), move it outside to a sheltered, bright spot. Celery hates heat above 24°C (75°F) and will bolt (go to seed without making proper stalks) in a hot room.
5. Water consistently
Check the top 2 cm (0.75 in) of soil every day. If it feels dry, water. Celery needs steady moisture — it evolved in boggy ground and punishes inconsistent watering with hollow, bitter stalks.
A free app like Tazart can track the schedule for you and adjust it when the season changes — useful once you have a few edibles on the go at once.
6. Feed after 2 weeks
After the plant has settled for 2 weeks, begin feeding with a balanced liquid fertilizer or a half-strength seaweed feed every 2 weeks. Celery is a heavy feeder and needs steady nitrogen to push out those long, succulent stalks.
7. Harvest timeline
| Stage | Timeframe | What you get |
|---|---|---|
| First shoots in water | Day 4-7 | Thin pale inner leaves, good chopped into soups |
| Harvestable water shoots | Day 10-14 | Thin stems up to 10-15 cm (4-6 in), mild celery flavour |
| Established soil plant | Week 4-8 | Stronger, greener stems, fuller flavour |
| Full-sized stalks | Month 4-6 | Stalks approaching grocery-store size — only with deep pot, rich soil, consistent moisture and cool temps |
Light, temperature, and conditions
Celery is more demanding than scallions or lettuce. It evolved in temperate, cool, moist regions and will tell you if conditions are wrong.
| Factor | Ideal | What goes wrong outside ideal |
|---|---|---|
| Light | 6+ hours bright indirect or direct (indoors); full sun (outdoors) | Pale, thin, floppy stems; slow regrowth |
| Temperature | 13-18°C (55-65°F) | Above 24°C (75°F): bolts to flower before stalks form |
| Water in dish | 2-3 cm (1 in), changed every 2 days | More: base rots; Less: base dries and dies |
| Soil moisture | Consistently moist — never dry, never waterlogged | Dry: hollow, bitter stalks; Wet: root rot |
| Humidity | Moderate — 40-60% relative humidity | Very dry air causes tips to brown |
Conditions in your kitchen will vary by season, by how close the plant is to the window, and by what direction the window faces. These numbers are starting points — observe your plant and adjust.
Common mistakes
- Using a deep glass instead of a shallow dish. In a tall glass, the base sits in far too much water and rots before it sprouts. Use a dish where the water sits at 2-3 cm (1 in) only.
- Not changing the water. The single most common reason the base goes brown and slimy. Every 2 days, no exceptions.
- Expecting full stalks from water alone. The water phase produces thin inner shoots for cooking — not the thick stalks you see in a supermarket. Set your expectations correctly.
- Planting in shallow soil. Celery roots long. A pot less than 20 cm (8 in) deep stunts the plant. Depth matters more than width.
- Putting it in a hot room. A south-facing window in summer can push room temperature above 28°C (82°F). Celery will bolt. Prefer a cool, bright window or an outdoor sheltered spot in spring and autumn.
- Letting the soil dry out. One week of neglect can turn soil-grown celery stalks hollow and bitter. Celery needs water — schedule it.
Troubleshooting
| Symptom | Likely cause | Fix |
|---|---|---|
| Base turns brown and slimy in the dish | Water not changed often enough, or too much water | Trim off brown tissue, start fresh in a clean rinsed dish with 2-3 cm (1 in) of water; change every 2 days |
| No shoots after 10 days | Base was old or already compromised before you started | Trim 5 mm (0.2 in) off the cut surface to expose fresh tissue; restart |
| Shoots appear then die back | Dish is too warm, or sitting in direct sun with no airflow | Move to a cooler, bright-but-shaded spot |
| Shoots are pale yellow, not green | Not enough light | Move to a brighter window; a south or east facing sill is ideal |
| Soil plant goes to flower without making stalks | Temperature too high — bolting | Cut the flower stalk off immediately; move the pot to a cooler spot; harvest remaining stems |
| Stalks are hollow | Inconsistent watering during soil phase | Water on a fixed schedule; never let the top 2 cm (0.75 in) dry out |
| Roots appear but no shoots | Normal in the first 3-5 days | Wait — roots establish before shoots push; give it another 3-4 days |
Other scraps that work the same way
Celery is one of a small group of vegetables that regrow easily from their base in shallow water. All follow the same core method: cut base, rinse, 2-3 cm (1 in) of fresh water in a shallow dish, bright light, water change every 2 days.
| Vegetable | Sprout speed | Notes |
|---|---|---|
| Scallions (green onions) | 2-3 days | Fastest of all. Narrow mouth jar keeps them upright. Multiple harvests in water before soil needed. |
| Romaine lettuce | 3-5 days | Regrows the inner heart leaves — enough for a salad garnish. Best used in water only, not transplanted. |
| Bok choy | 4-6 days | Behaves identically to celery. Produces inner leaves and small shoots; transplants well to soil. |
| Celery | 4-7 days | Slowest sprout, highest reward when transplanted — months of shoots and eventually stalks. |
For scallions specifically, see the full guide at How to grow scallions from scraps — it covers water depth, changing schedules, and moving to soil in the same level of detail as this article.
Watch: regrowing celery from scraps
A visual walkthrough of the water phase helps if you want to see exactly how much water to use and what the shoot emergence looks like day by day. Search “how to regrow celery from scraps” on YouTube for a short tutorial that pairs well with the transplanting steps above.
Related reading
- How to grow scallions from scraps — the fastest windowsill regrow of all, ready to harvest in 7 days.
- How to grow lettuce in containers — pair regrown celery with a cut-and-come-again lettuce pot for a built-in salad station.
- How to grow spinach — another cool-season edible that thrives in the same conditions as soil-transplanted celery.
- Use the free Tazart plant care app to track your celery watering schedule and get reminders — especially useful once you move it to soil and need consistent moisture.
A note on conditions
Every kitchen window is different. Light intensity, ambient temperature, water mineral content, pot size, season, and even how fresh the original bunch was will all change how fast your celery base sprouts and how long it continues to produce. The steps and timelines in this guide are reliable starting points — observe your specific plant in week two and adjust from there. That is how every good kitchen gardener learns.
Highly recommended
The supplies that make this guide work

Tazart is an Amazon Associate — we earn from qualifying purchases at no extra cost to you. Thank you for helping us keep these guides free.
Frequently asked questions
Can you regrow celery from the base?
Yes. The cut base of a store-bought celery bunch contains dormant growth nodes that resprout when placed in shallow water. Set the base cut-side up in 2-3 cm (1 in) of water on a bright windowsill and you will see green shoots emerge in 4 to 7 days.
How long does celery take to regrow from scraps?
Tiny green shoots appear in 4 to 7 days. Harvestable inner shoots (good for soups and stocks) develop in 10 to 14 days. A full transplanted plant that produces genuine long stalks takes 4 to 6 months in a deep pot of rich soil, since celery is a slow cool-season crop.
Will regrown celery taste like the original?
Inner shoots taste mildly celery-flavoured and are excellent in cooking. They will not be as thick or as long as the grocery-store stalks, which are grown for 3 to 4 months in rich, deeply watered beds. Think of the regrowth as a supply of fresh celery leaf and thin inner stems, not a replacement for full stalks.
Can I plant celery scraps in soil instead of water?
Yes, after the water phase. Allow roots 2-4 cm (1 in) long to develop over 7 to 10 days in water first, then transplant the base into a 15 cm (6 in) deep pot filled with moist, rich potting mix. Bury the base so only the green shoots poke above the soil surface. Keep it consistently moist and in a cool, bright spot.
How often should I change the water for celery scraps?
Every 2 days without fail. Stagnant water breeds the bacteria that cause the base to go brown and slimy. Rinse the dish and the base gently under the tap each time you refill. The water level should sit at 2-3 cm (1 in) — just enough to cover the cut surface, not so much that it drowns the emerging shoots.
Does regrown celery produce full stalks?
Not from the water phase alone. Water regrowth gives you thin, pale inner shoots — great for flavour in cooking, not for snacking the way you would a thick grocery-store stalk. For genuine full-sized stalks, you must transplant to deep, rich soil and grow on for 4 to 6 months, the same as growing celery from seed.
What other vegetables can I regrow from scraps the same way?
Romaine lettuce hearts, bok choy bases, and scallion (green onion) root ends all regrow in shallow water by exactly the same method. Scallions are the fastest (shoots in 2 to 3 days). Bok choy and romaine follow in 3 to 5 days. Celery is the slowest of the four but produces the most usable material once transplanted to soil.
Why is my celery base going brown and slimy?
Almost always stagnant water. Change it every 2 days, keep the dish clean, and make sure the water covers only the very bottom of the base — 2-3 cm (1 in) max. If the outside of the base is already rotting, trim away the soft brown sections with a clean knife to expose fresh tissue before restarting in a clean dish.