Edible
How Deep to Plant Garlic (Exact Depth by Zone)
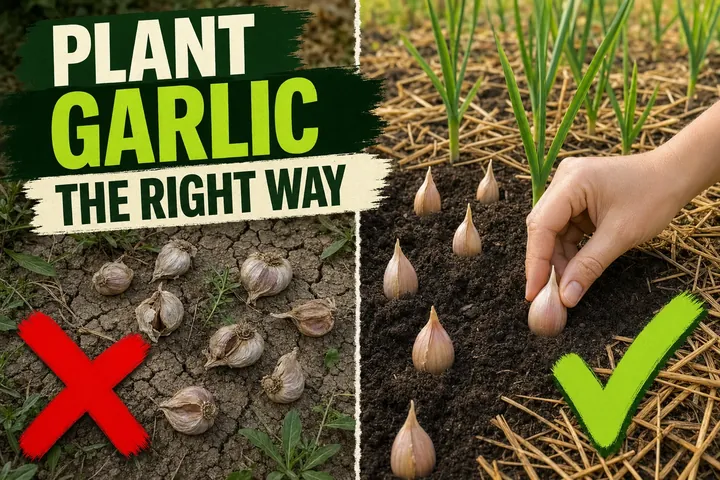
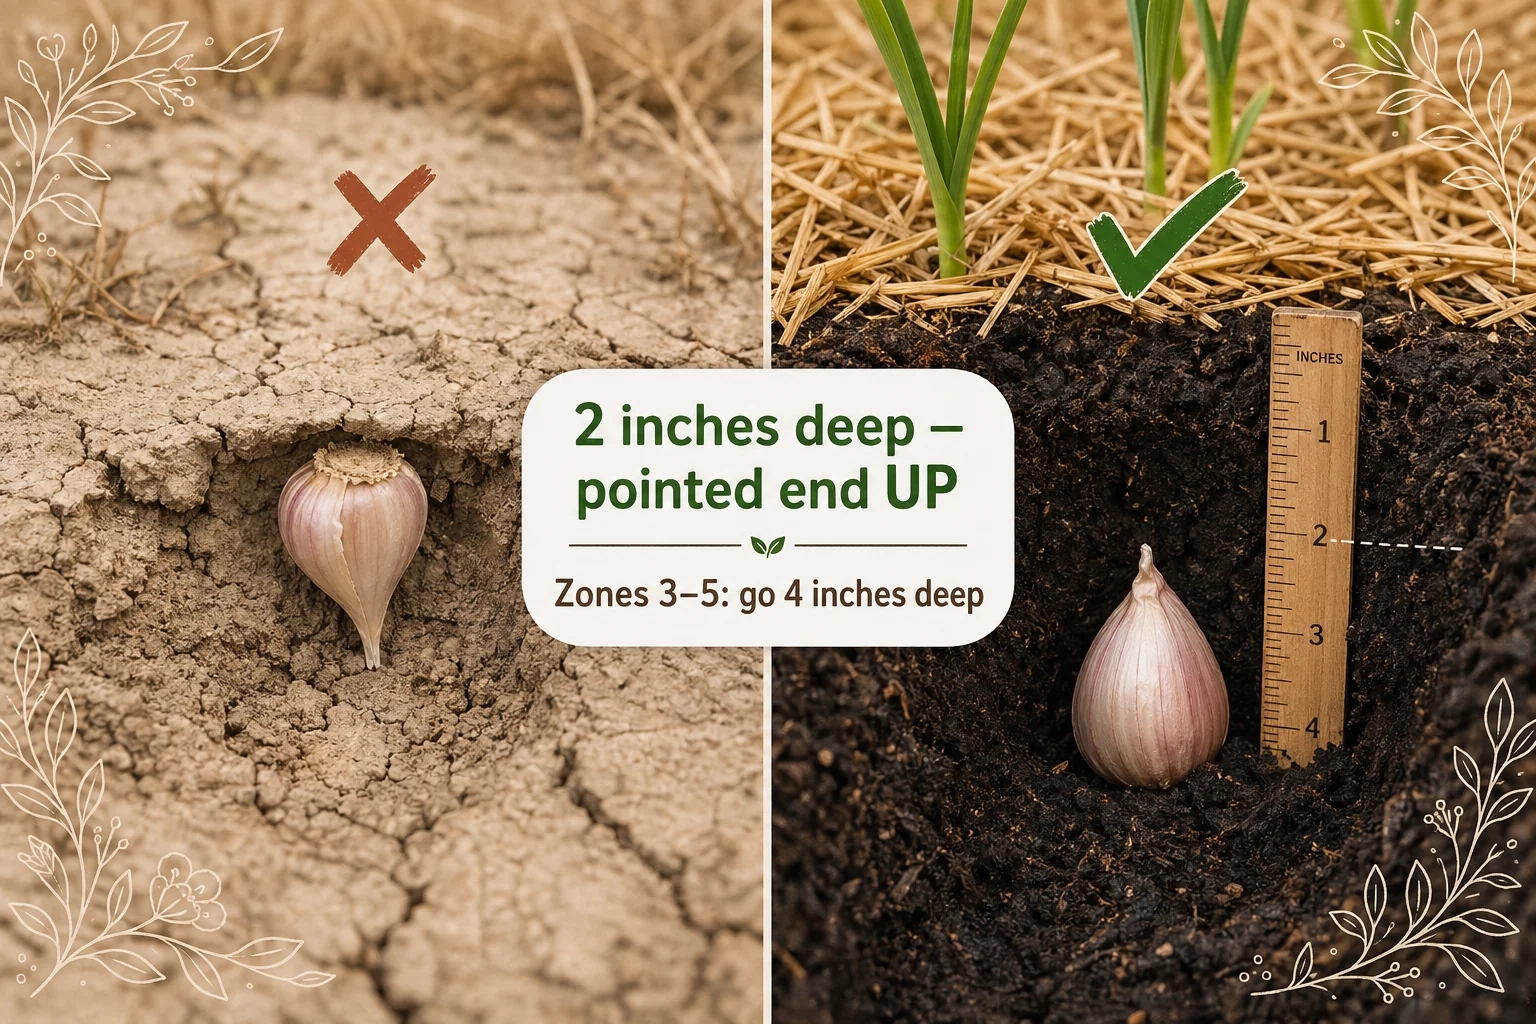
Plant garlic 2 inches deep with the pointed end up, 6 inches apart in rows 12 inches apart. Cold-zone growers (zones 3–5) should plant 4 inches deep. Full planting depth
On this page
- Quick answer
- Why depth matters for garlic
- Softneck vs hardneck planting depth
- Step-by-step: setting the right planting depth
- Spacing between cloves and between rows
- How much mulch on top
- Cold-zone deeper planting: zones 3–5
- When to plant: fall is the only right answer
- Common depth mistakes to avoid
- Related reading
- A note on conditions
Watch the visual walkthrough
How To Plant Garlic For BIG Harvests
In this video will teach you how to plant garlic the easy way from start to finish for big garlic harvests. Garlic planting is easy: it is ...
Garlic depth is one of those details that looks simple — and usually is — but getting it wrong costs you an entire season. Cloves planted too shallow heave out of the ground over winter; cloves planted too deep in spring-like climates waste weeks pushing through excess soil. The correct number changes by climate zone, garlic type, and soil structure.
This guide gives you the exact depth for every situation, plus spacing, timing, and the cold-zone adjustment that most standard planting guides leave out.
Quick answer
Plant garlic cloves 2 inches (5 cm) deep with the pointed end facing up. Space them 6 inches (15 cm) apart in rows 12 inches (30 cm) apart. In cold USDA zones 3–5 where the ground freezes hard, increase depth to 4 inches (10 cm) and mulch with 4–6 inches of straw. Plant 4–6 weeks before the ground freezes in fall.
Why depth matters for garlic
Unlike most vegetable seeds, garlic is planted in fall and spends the entire winter underground. That long dormancy means depth does two jobs at once.
Protection from freeze-thaw heaving. When soil freezes and thaws repeatedly — which is common in zones 5–7 through late autumn — it physically pushes objects upward through a process called frost heaving. A clove planted at 1 inch can end up sitting on the surface by January. A clove planted at 2–4 inches stays put.
Thermal buffer for the basal plate. The basal plate is the flat root-growing end of the clove. If it freezes solid before roots have established, the clove dies. Extra depth keeps the basal plate just below the reach of surface freeze events. This is why cold-zone growers plant deeper, not shallower.
Shoot emergence in spring. Go too deep and the shoot has to travel too far. At 6 inches or more in standard soil, emergence is slow, the shoot arrives weak, and the plant starts the growing season behind. Two to four inches is the functional sweet spot for shoot-to-surface distance.
Softneck vs hardneck planting depth
The two main garlic families behave differently underground, and their preferred climates drive different depth recommendations.
| Type | Zones | Standard depth | Cold-zone depth |
|---|---|---|---|
| Hardneck (Allium sativum var. ophioscorodon) | 3–6 | 2–3 inches | 4 inches in zones 3–5 |
| Softneck (Allium sativum var. sativum) | 7–10 | 2 inches | 3 inches in zone 6 |
Hardneck garlic is the cold-climate specialist. Varieties like Rocambole, Porcelain, and Purple Stripe are grown in zones 3–6, where winters are severe. They produce larger individual cloves arranged loosely around a central hard stem, and they throw up a curling flower stalk called a scape in late spring. Because hardneck garlic grows where the ground freezes deeply, it is planted at 3–4 inches depth by default, with cold-zone growers going the full 4 inches.
Softneck garlic thrives where winters are mild — zones 7–10. Varieties like Artichoke and Silverskin produce more cloves per bulb but smaller ones, with no scape. Because softneck zones rarely see sustained hard freezes, 2 inches is all that is needed for frost protection. The shallower depth also means slightly earlier spring emergence.
Quick rule: if your winters reliably drop below freezing for weeks at a time and you live north of zone 6, plant hardneck at 3–4 inches. If you garden in a mild-winter climate, plant softneck at 2 inches.
Step-by-step: setting the right planting depth
1. Break the bulb into individual cloves
Just before planting, gently pull the bulb apart with your fingers into separate cloves. Do not peel them — the papery skin protects the clove underground and slows drying. Do this on planting day, not weeks ahead.
2. Pick only the largest, firmest outer cloves
Plant the biggest outer cloves exclusively. The rule in garlic is simple: large clove in, large bulb out. Small inner cloves are edible but they yield small bulbs. Reject anything soft, shriveled, or showing mould.
3. Prepare the bed
Loosen the soil to at least 8 inches deep and fork in a layer of compost or well-rotted manure. Garlic needs well-drained, loose, fertile ground. Heavy clay holds too much moisture and rots cloves over winter — if your soil is sticky, plant in a raised bed or work in coarse grit and compost.
Avoid beds where you grew onions, leeks, or other alliums in the last three years to reduce risk of white rot and other soil-borne diseases.
4. Set the depth: 2 inches or 4 inches?
Use a dibber, a pencil, or your index finger to mark the right depth before dropping each clove in.
- Zones 6–10 (mild to moderate winters): 2 inches deep. This puts the basal plate safely below freeze events while keeping the shoot close enough to the surface to emerge quickly in spring.
- Zones 3–5 (cold winters with hard ground freeze): 4 inches deep. The extra two inches buffers the basal plate from the hardest freezes and reduces heaving risk on uninsulated beds.
- Zone 6 with heavy clay or exposed north-facing beds: treat as zone 5 and go 3–4 inches.
Measure from the tip of the clove to the soil surface — not from the flat root end. A 2-inch hole with a 1-inch clove means the tip is 1 inch from the surface: too shallow. Make the hole deep enough that the tip sits exactly 2 inches below grade.
5. Orient every clove pointed end up
This single step catches out more beginners than any other. Drop the clove in with the pointed tip facing straight up and the flat basal plate at the bottom. The shoot emerges from the tip; the roots grow from the flat plate. Upside-down cloves still grow eventually, but the shoot wastes weeks curling around underground and the resulting bulb is smaller and often off-shaped.
If you cannot tell which end is the tip on small cloves, look for a slight narrowing at one end — that is the top. When genuinely unsure, plant horizontally and let the clove sort itself out.
6. Space cloves 6 inches apart, rows 12 inches apart
Place each clove 6 inches from its neighbours in the row. Rows should be 12 inches apart. Crowded garlic competes for nutrients and produces noticeably smaller bulbs at harvest. In a raised bed 12 inches wide you get two offset rows; in a standard in-ground bed you can fit four or five rows with 12-inch spacing.
A garden fork or a measuring stick makes consistent 6-inch spacing fast across a long row.
7. Backfill and water once
Cover each clove with loose soil and firm it gently with your hand or the back of the trowel — enough to eliminate air pockets, not enough to compact. Water the bed once to settle the soil around the cloves. One thorough watering is all that is needed at planting time.
8. Mulch immediately
Lay down 4–6 inches of straw, shredded leaves, or untreated grass clippings across the entire bed right after planting. Mulch does three things: it insulates against freeze-thaw heaving, suppresses winter weeds, and holds moisture. In zones 3–5 where you are planting at 4 inches, the mulch layer is not optional — it is part of the depth strategy.
Spacing between cloves and between rows
| Measurement | Standard recommendation |
|---|---|
| Clove to clove (in-row) | 6 inches (15 cm) |
| Row to row | 12 inches (30 cm) |
| Depth (zones 6–10) | 2 inches (5 cm) |
| Depth (zones 3–5) | 4 inches (10 cm) |
| Mulch depth | 4–6 inches (10–15 cm) |
These spacings are not arbitrary. Each garlic plant needs to develop a bulb that can be 2–3 inches in diameter at harvest. Six inches of spacing gives each clove a 6-inch-radius growing column underground. Reduce spacing to 4 inches and you get noticeably smaller bulbs. Go wider than 6 inches and you are wasting bed space.
How much mulch on top
Mulch depth is part of the depth calculation, especially in cold zones. Think of the mulch layer as a thermal blanket that extends the protective effect of deeper planting.
- Zones 7–10: 2–3 inches of straw is plenty.
- Zones 5–6: 3–4 inches of straw.
- Zones 3–5: 4–6 inches of straw, applied right after planting before the first hard freeze. The mulch itself will compress over winter — re-apply in early spring if there are large bare patches.
In spring, do not remove the mulch. Let the shoots push through it — they will find their way. The mulch continues to suppress weeds and retain moisture as the plants grow. Only pull it back slightly around the base of each shoot once they are 4–6 inches tall, to let the soil warm up for bulb development.
Cold-zone deeper planting: zones 3–5
The standard 2-inch depth works well in zones 6–10, but zones 3–5 bring genuinely different conditions. Ground freezes can penetrate 6–12 inches in a severe Minnesota or Vermont winter. The combination of deep planting (4 inches) plus heavy mulch (4–6 inches) creates a combined 8–10 inches of protection between the basal plate and the frozen air above — enough to carry even Rocambole hardneck through a zone 3 winter.
Specific adjustments for cold-zone growers:
- Plant by mid-September to early October — earlier than the general advice of “6 weeks before first frost,” because your first frost arrives sooner and the ground freezes faster.
- Use hardneck varieties only — Porcelain and Rocambole perform best in zones 3–5. Softneck will not cold-harden reliably.
- Mulch the same day you plant, not the next weekend.
- In zone 3, consider a layer of garden fabric under the straw for additional insulation on the most exposed beds.
When to plant: fall is the only right answer
Depth and timing work together. Garlic planted at the right depth in the wrong season still fails.
Fall planting (ideal): 4–6 weeks before the ground freezes, typically mid-September to late October depending on your zone. This window lets the cloves grow a small root mass before dormancy, which anchors them against heaving. It also delivers the 6–8 weeks below 10 °C (50 °F) that garlic needs for vernalization — the cold trigger that tells the plant to form a multi-clove bulb the following summer.
Spring planting (backup): Plant as early as the soil is workable. Spring-planted garlic misses most of its vernalization window and tends to produce “rounds” — single undivided bulbs — rather than full multi-clove heads. If you missed fall, plant in early spring anyway and expect a modest harvest of rounds.
A free plant care app like Tazart can log your planting date and send a reminder when it’s time to check for scapes, stop watering, and harvest — useful when you have multiple garlic varieties on different schedules.
Common depth mistakes to avoid
Planting at 1 inch or less. In any zone with freezing temperatures, this depth guarantees frost heaving. Even with heavy mulch, cloves at 1 inch are vulnerable. If you used a standard seed drill set to 1 inch, redo the bed by hand.
Using the same depth regardless of zone. Following the “2-inch rule” in zone 4 without mulch is how growers lose half their cloves over winter. Read your zone label and adjust.
Measuring depth from the root plate, not the tip. A 1-inch clove in a 2-inch hole has its tip at 1 inch below the surface — not 2 inches. Measure from tip to soil surface.
Skipping orientation when in a hurry. When planting 50–100 cloves across a long bed, it is tempting to rush and drop cloves in without checking the tip direction. The time cost of orienting every clove is about 20 seconds. The yield cost of planting half upside-down is 20–30% smaller bulbs.
Not mulching cold-zone beds. Deep planting alone in zones 3–5 is not sufficient. The 4-inch depth plus 4–6 inches of straw is the system — both parts are required.
Planting hardneck varieties at softneck depth. If you sourced Rocambole for a zone 4 garden and planted it at 2 inches without mulch, you will likely lose a large portion to the first deep freeze. Match variety to zone to depth.
Related reading
- How to plant garlic cloves — the full step-by-step guide covering timing, hardneck vs softneck, care after planting, and how to know garlic is ready to harvest.
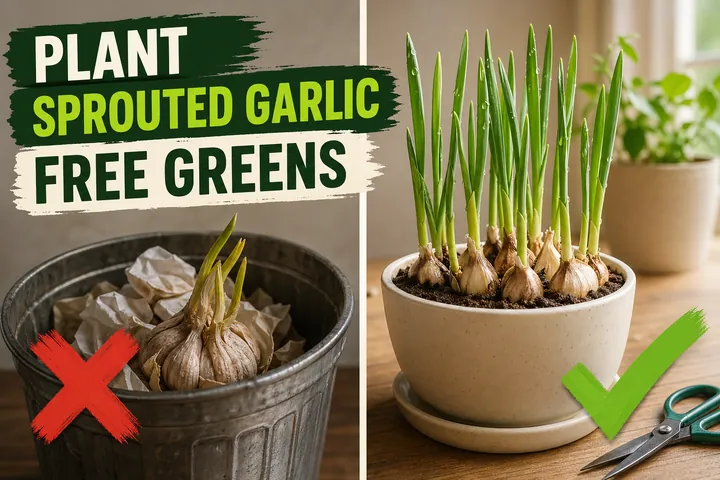
- How to plant sprouted garlic — what to do when your seed garlic has already started growing before planting day.
- How deep to plant corn — another crop where planting depth changes by soil conditions and season.
- Track your garlic’s watering, fertilizing, and harvest schedule with the free Tazart plant care app — it adjusts reminders for your local climate automatically.
A note on conditions
Every garden is different. Soil texture, drainage, microclimate, variety, and your specific frost dates all interact with planting depth in ways no single guide can fully predict. Use the depths above as a strong, evidence-based starting point. After your first season, note what emerged well and what heaved, and adjust by half an inch if needed — that is how every experienced garlic grower dials in their patch.
Highly recommended
The supplies that make this guide work


Tazart is an Amazon Associate — we earn from qualifying purchases at no extra cost to you. Thank you for helping us keep these guides free.
Frequently asked questions
How deep should garlic be planted?
Plant garlic cloves 2 inches (5 cm) deep in most climates — measured from the tip of the clove to the soil surface. In cold zones 3–5 where the ground freezes hard, go deeper: 4 inches (10 cm) with an extra layer of mulch on top to insulate the cloves through winter.
Should garlic be planted point up or down?
Always pointed end up. The pointed tip is where the green shoot emerges; the flat basal plate at the bottom is where roots form. Cloves planted upside-down still grow, but they waste energy twisting around to find the surface and produce smaller, often misshapen bulbs.
How far apart do you plant garlic cloves?
Space cloves 6 inches (15 cm) apart within the row, with rows 12 inches (30 cm) apart. This spacing gives each bulb enough room to size up underground without competing for nutrients. Crowded cloves produce smaller bulbs.
When should you plant garlic in fall?
Plant garlic 4–6 weeks before the ground freezes in fall — typically mid-September to late October in most temperate climates. This window lets roots establish before winter dormancy. Garlic needs a cold period (vernalization) to split into a full multi-clove bulb the following summer.
Does hardneck garlic need to be planted deeper than softneck?
Generally yes. Hardneck varieties, grown in cold zones 3–6, benefit from 3–4 inches of depth to protect the basal plate through hard freezes. Softneck garlic grown in milder zones 7–10 does fine at the standard 2-inch depth.
How deep should garlic be planted in cold climates?
In USDA zones 3–5 where winters are severe, plant garlic 4 inches (10 cm) deep. The extra depth protects the basal plate from freeze-thaw heaving and keeps the clove from icing over before roots are established. Always top with 4–6 inches of straw mulch as well.
What happens if you plant garlic too shallow?
Cloves planted at 1 inch or less are highly vulnerable to freeze-thaw cycles. As the soil expands and contracts with temperature swings, it physically pushes the cloves out of the ground — a process called frost heaving. Exposed cloves dry out, freeze solid, or rot before spring.
Can you plant garlic too deep?
Yes. Garlic planted deeper than 4–5 inches in average soil struggles to push shoots through the soil in spring, which delays emergence and weakens the plant. Stick to 2 inches in zones 6–10 and 4 inches in zones 3–5.